← Product page

How I use NeckPilot

Pick a musical question and work through it.

I wrote these guides around things you might actually try with an instrument in your hands. Each one shows where to tap, what should appear, whether the feature is Free or Pro, and where its answer has limits.

Before using the microphone

Tune the instrument and reduce room noise. NeckPilot asks for access when you start Tuner, Play Mode, or Key Finder.

If the fretboard looks unexpected

Check the Root, Content, Pattern, Labels, and instrument setup. One of those choices usually explains the markers.

If a beat is already playing

Starting a microphone feature stops the Metronome or Drum Machine after setup succeeds.

FreeGuide 01

Put A minor across the fretboard

I know the song is in A minor. Where can I play?

  1. 1

    Open Explorer from Home.

  2. 2

    Set Root to A. Then open Content, choose Scales, and select Aeolian (Natural minor).

  3. 3

    Stay on Full neck for the first look. Set Labels to Notes + intervals so you can spot every A and read the scale degrees.

  4. 4

    Tap any marker to hear the note. Landscape gives the fretboard the most room.

  5. 5

    Open Theory, then Chords in this key. You will see Am, Bdim, C, Dm, Em, F, and G. Tap one to put its chord tones on the neck.

What you should see

The fretboard now shows every note in A natural minor. From there, you can open any of its seven diatonic triads.

Keep in mind

The note A does not tell you which A scale a song uses. A song may also borrow chords or change key.

A scale displayed across the full NeckPilot fretboard

Screenshot: A scale displayed across the full NeckPilot fretboard.

FreeGuide 02

Pick one area of the neck to practise

The full neck is useful, but where should I start?

  1. 1

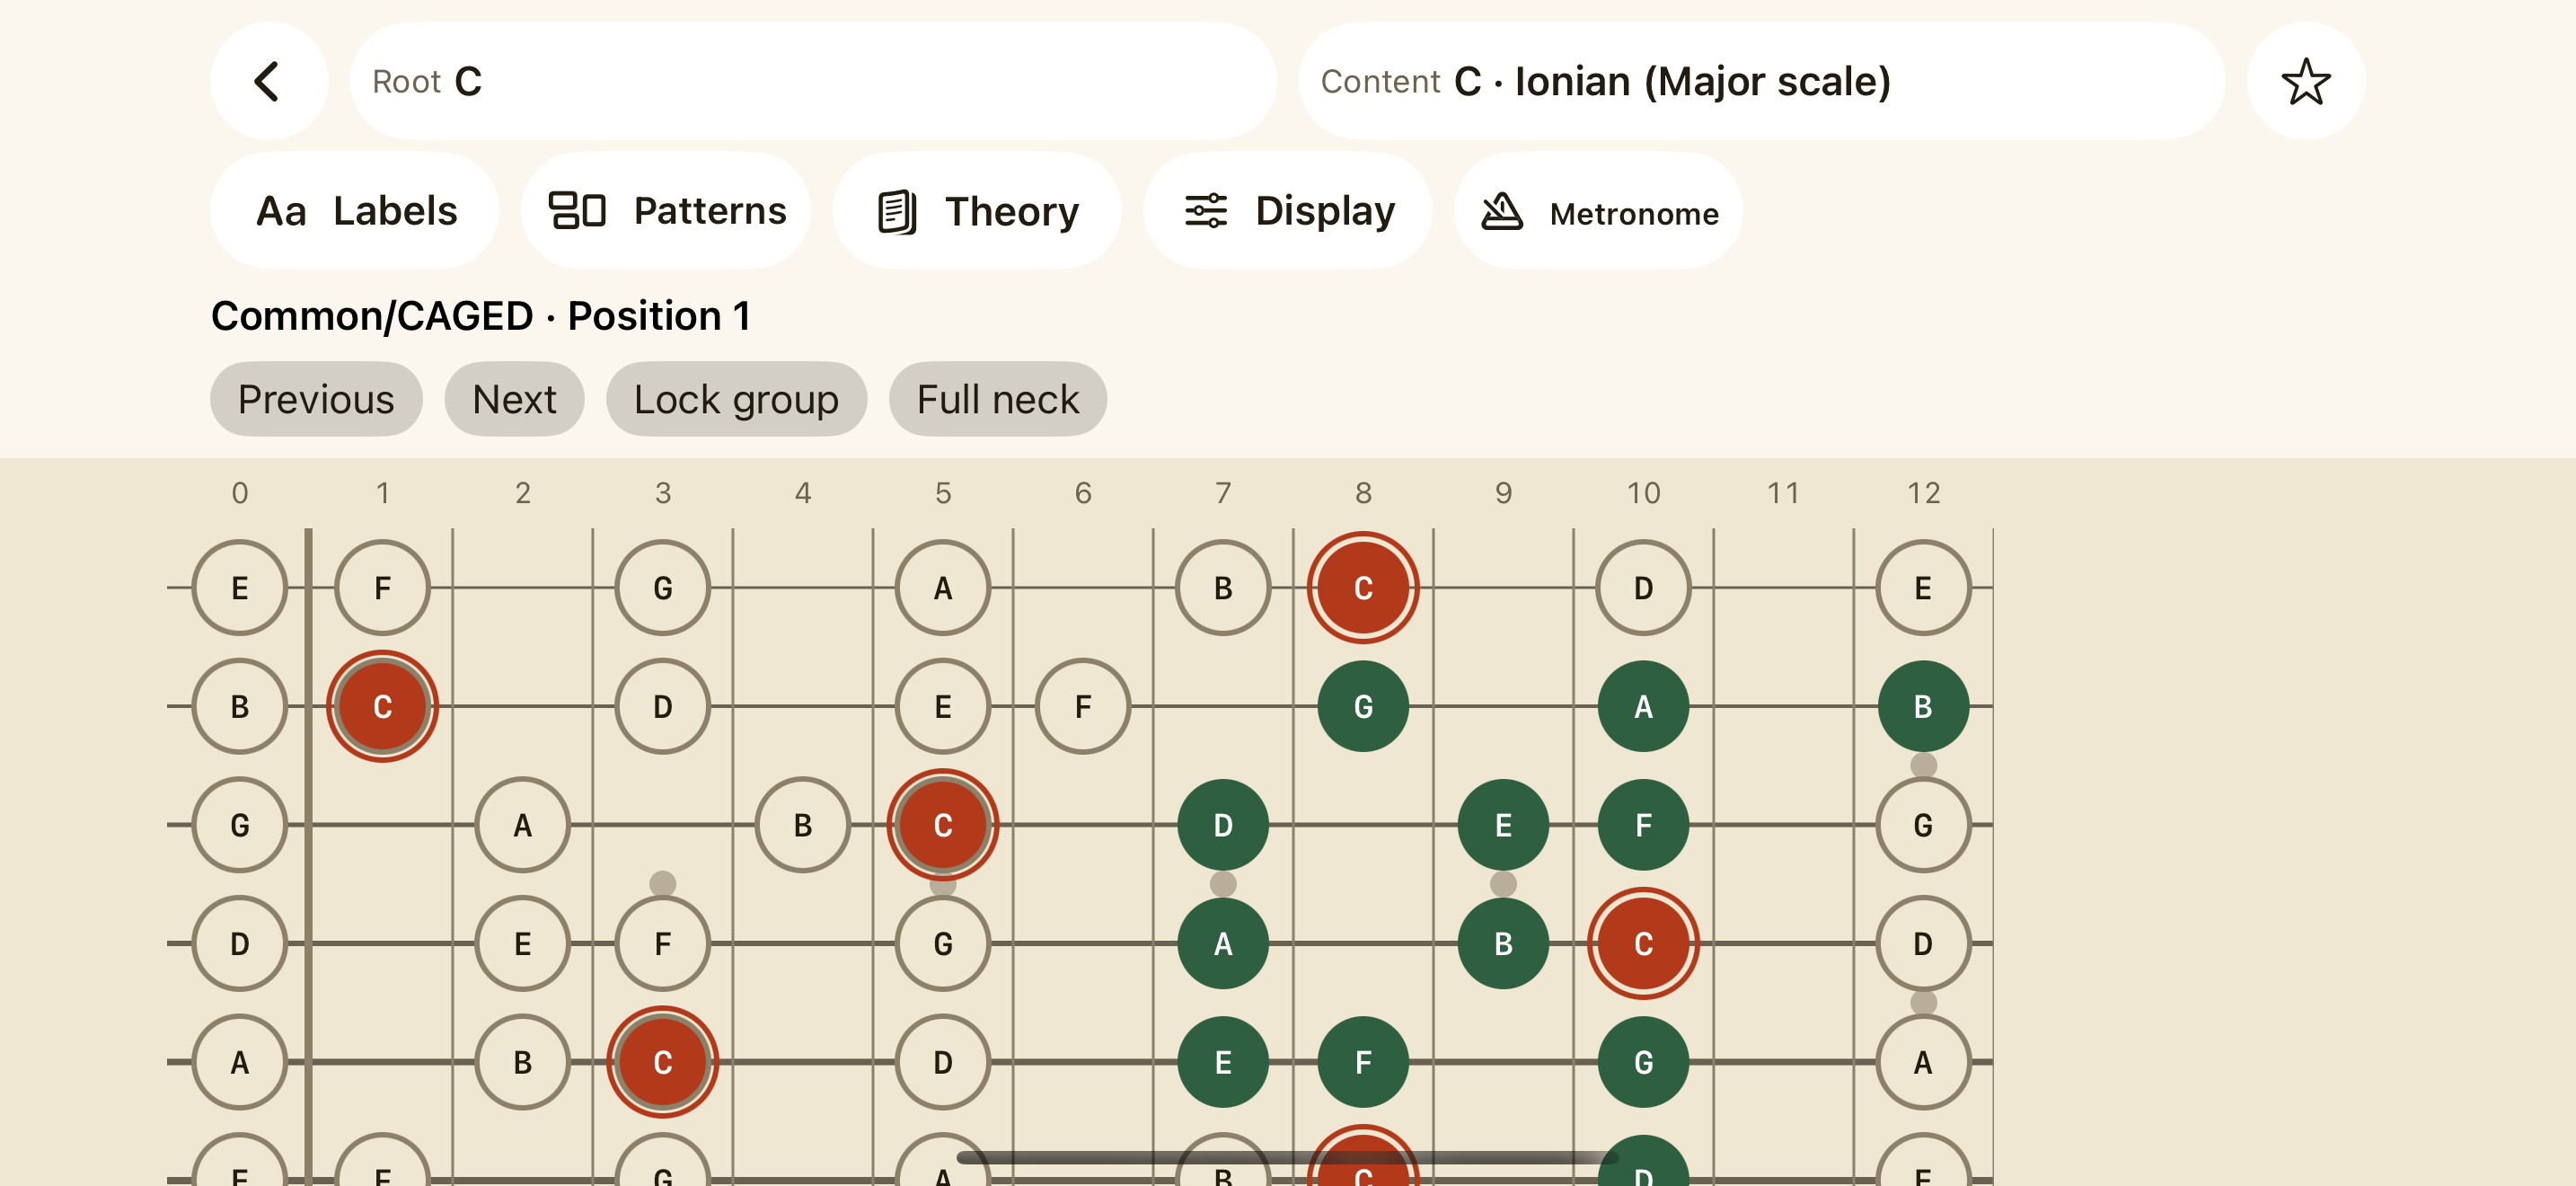
    With a scale active, open Patterns.

  2. 2

    Choose a Common/CAGED position if you already know those shapes. Pick 3NPS for three notes per string, or use a pentatonic box for a smaller five-note shape.

  3. 3

    Previous and Next move to another occurrence without changing the root or scale.

  4. 4

    Context notes can be shown, dimmed, or hidden. Dim keeps the rest of the scale visible while the chosen position stands out.

  5. 5

    To keep your own area, add a custom pattern, select its frets and notes, give it a name, and save it. Custom patterns stay on this device.

What you should see

You now have a smaller area to practise, with as much or as little of the surrounding scale as you want.

Keep in mind

A position covers only part of a scale. Return to Full neck occasionally so the shape does not become the whole picture.

A focused Common CAGED position in Explorer

Screenshot: A focused Common CAGED position in Explorer.

FreeGuide 03

Find music by name or by notes

I know a name, a chord, or perhaps only a few notes. Where do I start?

  1. 1

    Search Content for a name such as A Dorian or C maj7. If you search for a formula without a root, NeckPilot keeps the Root that is already selected.

  2. 2

    If the notes are all you know, open Theory, choose Find by notes, and select them. Exact matches appear alongside close ones.

  3. 3

    For a compatible seven-note scale, Chords in this key shows the Roman numerals and chord names. Progressions has patterns such as I-V-vi-IV that you can resolve at the tonic you choose.

  4. 4

    Tap the star when you want to keep the result. A Favorite can reopen the Explorer setup or the resolved progression.

What you should see

You can start with a name or a set of notes, put the result on the fretboard, and save it for later.

Keep in mind

Find by notes compares pitch sets. It cannot know the role those notes play in a song, so treat the matches as possibilities rather than a final answer.

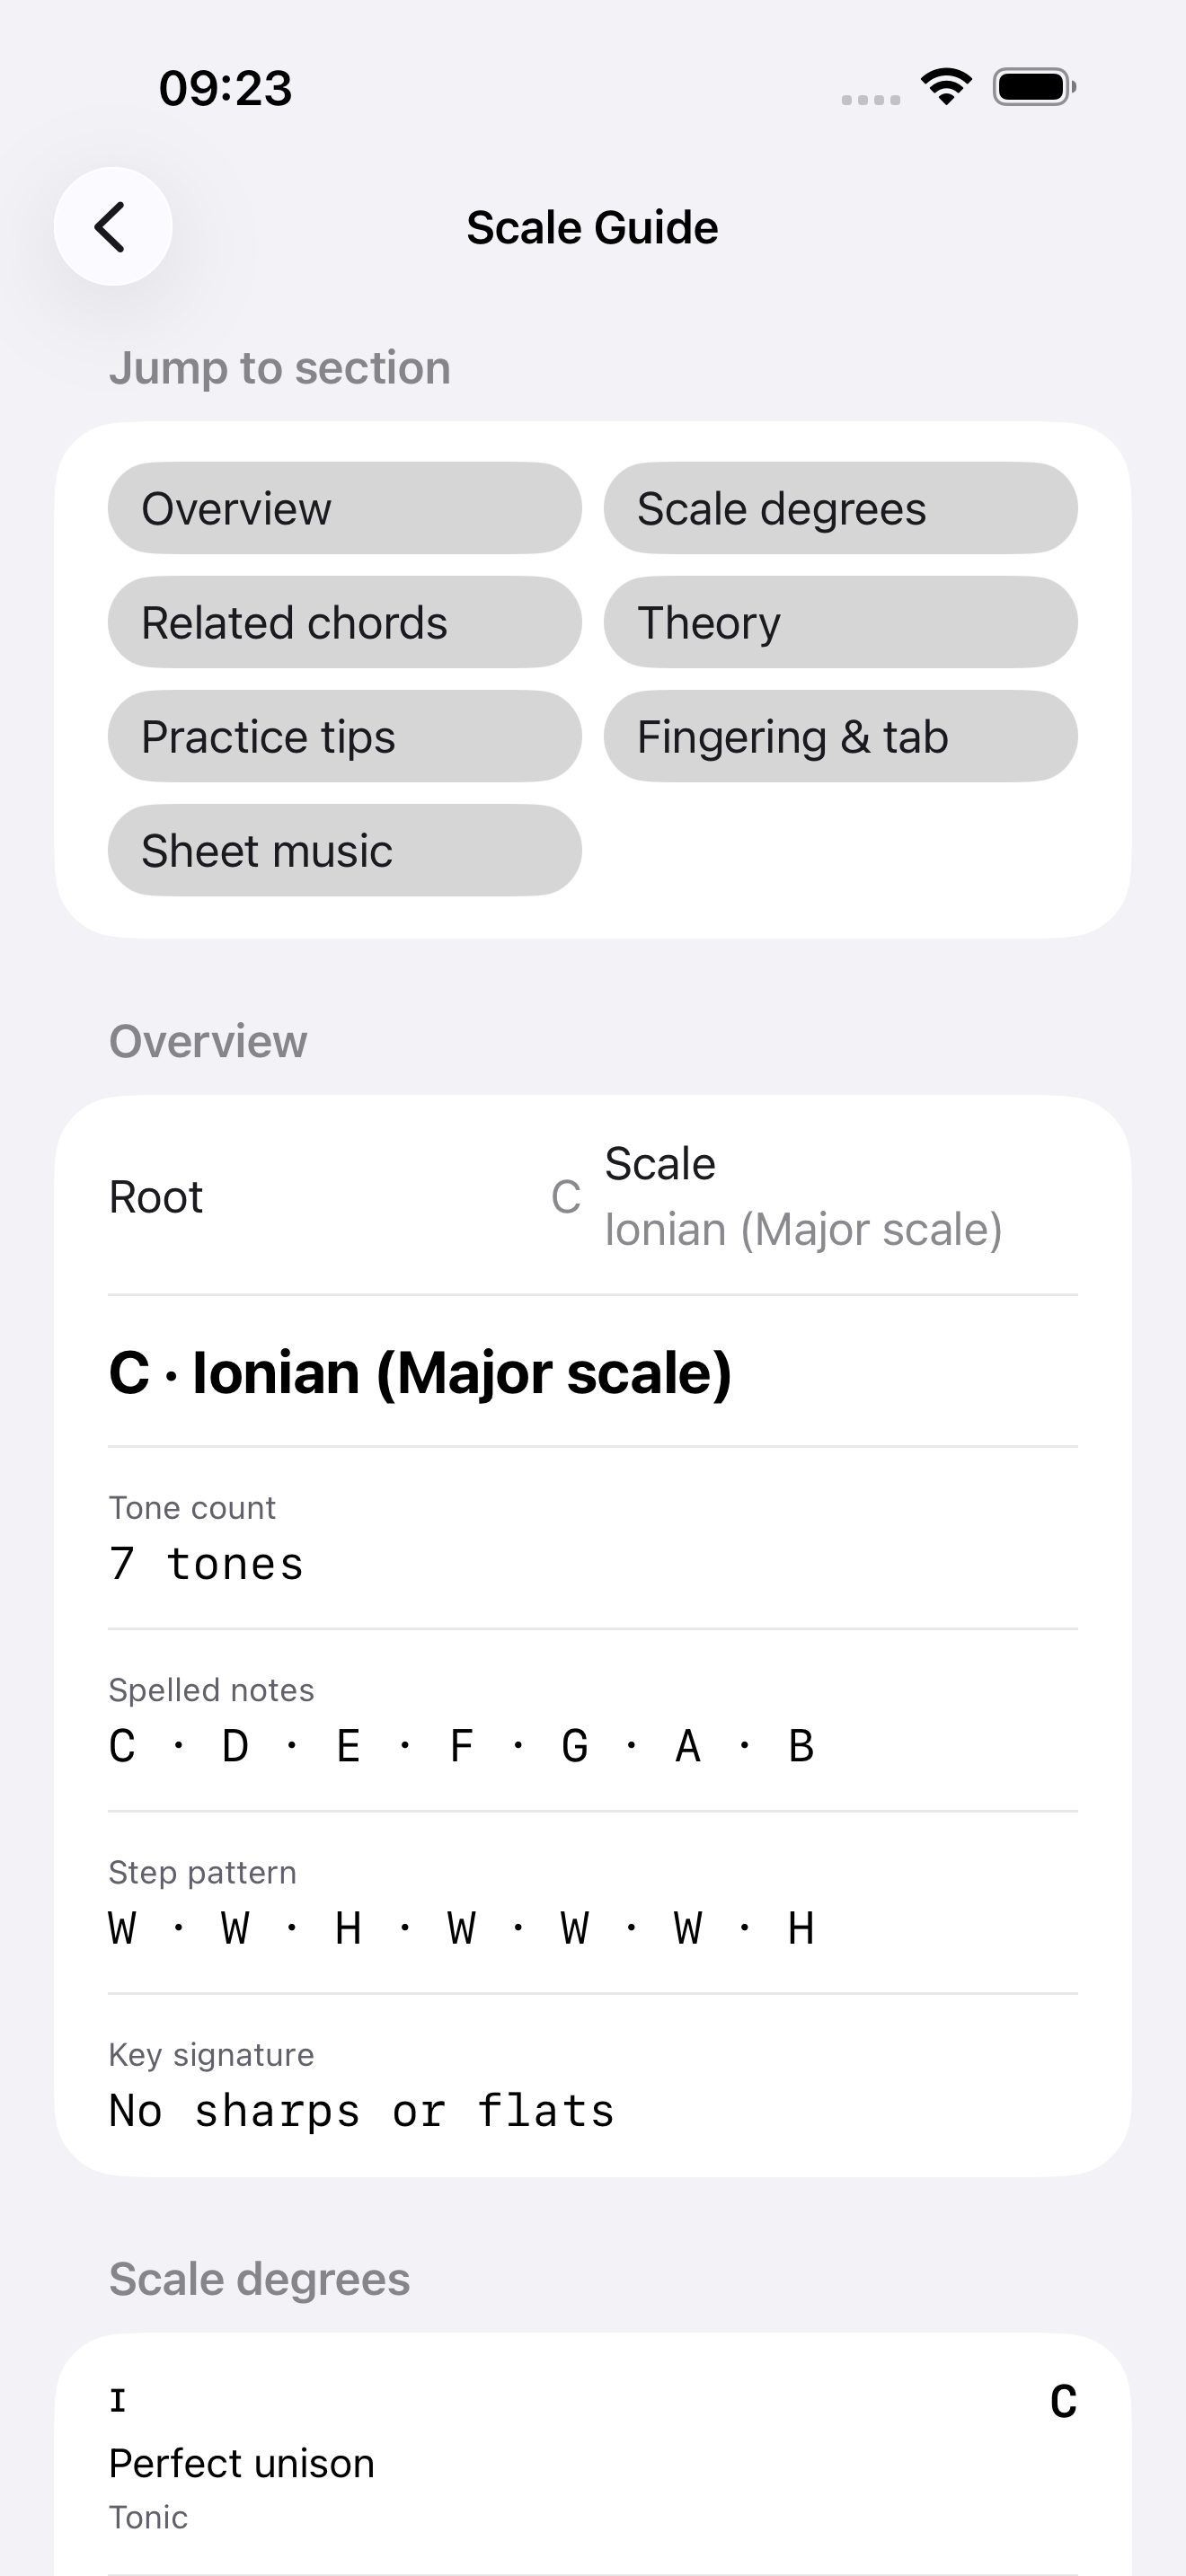
NeckPilot Theory Guide showing scale information

Screenshot: NeckPilot Theory Guide showing scale information.

ProGuide 04

See which notes a scale and chord share

Which notes in this scale belong to the chord I am playing over?

  1. 1

    Choose a scale position first if you want to keep it as the Base. Then open Layers and tap Manage. The Base is the shape or area you are practising. Numbered Layers are the musical ideas placed over it.

  2. 2

    Add a chord, arpeggio, scale, or compatible pattern. With A Aeolian, try an A minor arpeggio plus the C and F chords. Choose Empty neck when you want guide notes without a filled Base.

  3. 3

    Close Manage. The numbered controls can show one source at a time or put them back together. On a shared fret, the marker tells you which sources contain that note.

  4. 4

    Add a Mask when you want to limit the physical area. A Mask does not change the notes in a scale or chord. In the editor, choose Add or Remove, set the scope to Note, String, or Fret, and tap the neck.

  5. 5

    For example, use Add with Fret scope to keep frets 5-8. Then choose Remove with String scope and tap the low E string. The musical Layers stay the same, but the screen now shows a four-fret area across five strings.

  6. 6

    Save the Base, Layers, and Mask as a Favorite if you want to return to them. In timed Layer practice, the Metronome or Drum beat changes the musical Layer while the Mask stays in place.

What you should see

The markers show which notes belong to each musical source. The Mask simply hides the part of the fretboard you do not want to work on.

Keep in mind

Layers describe musical membership. A Mask describes an area of the neck. Hiding a note with the Mask does not remove it from the scale or chord. You still need to check that independently chosen material fits the song.
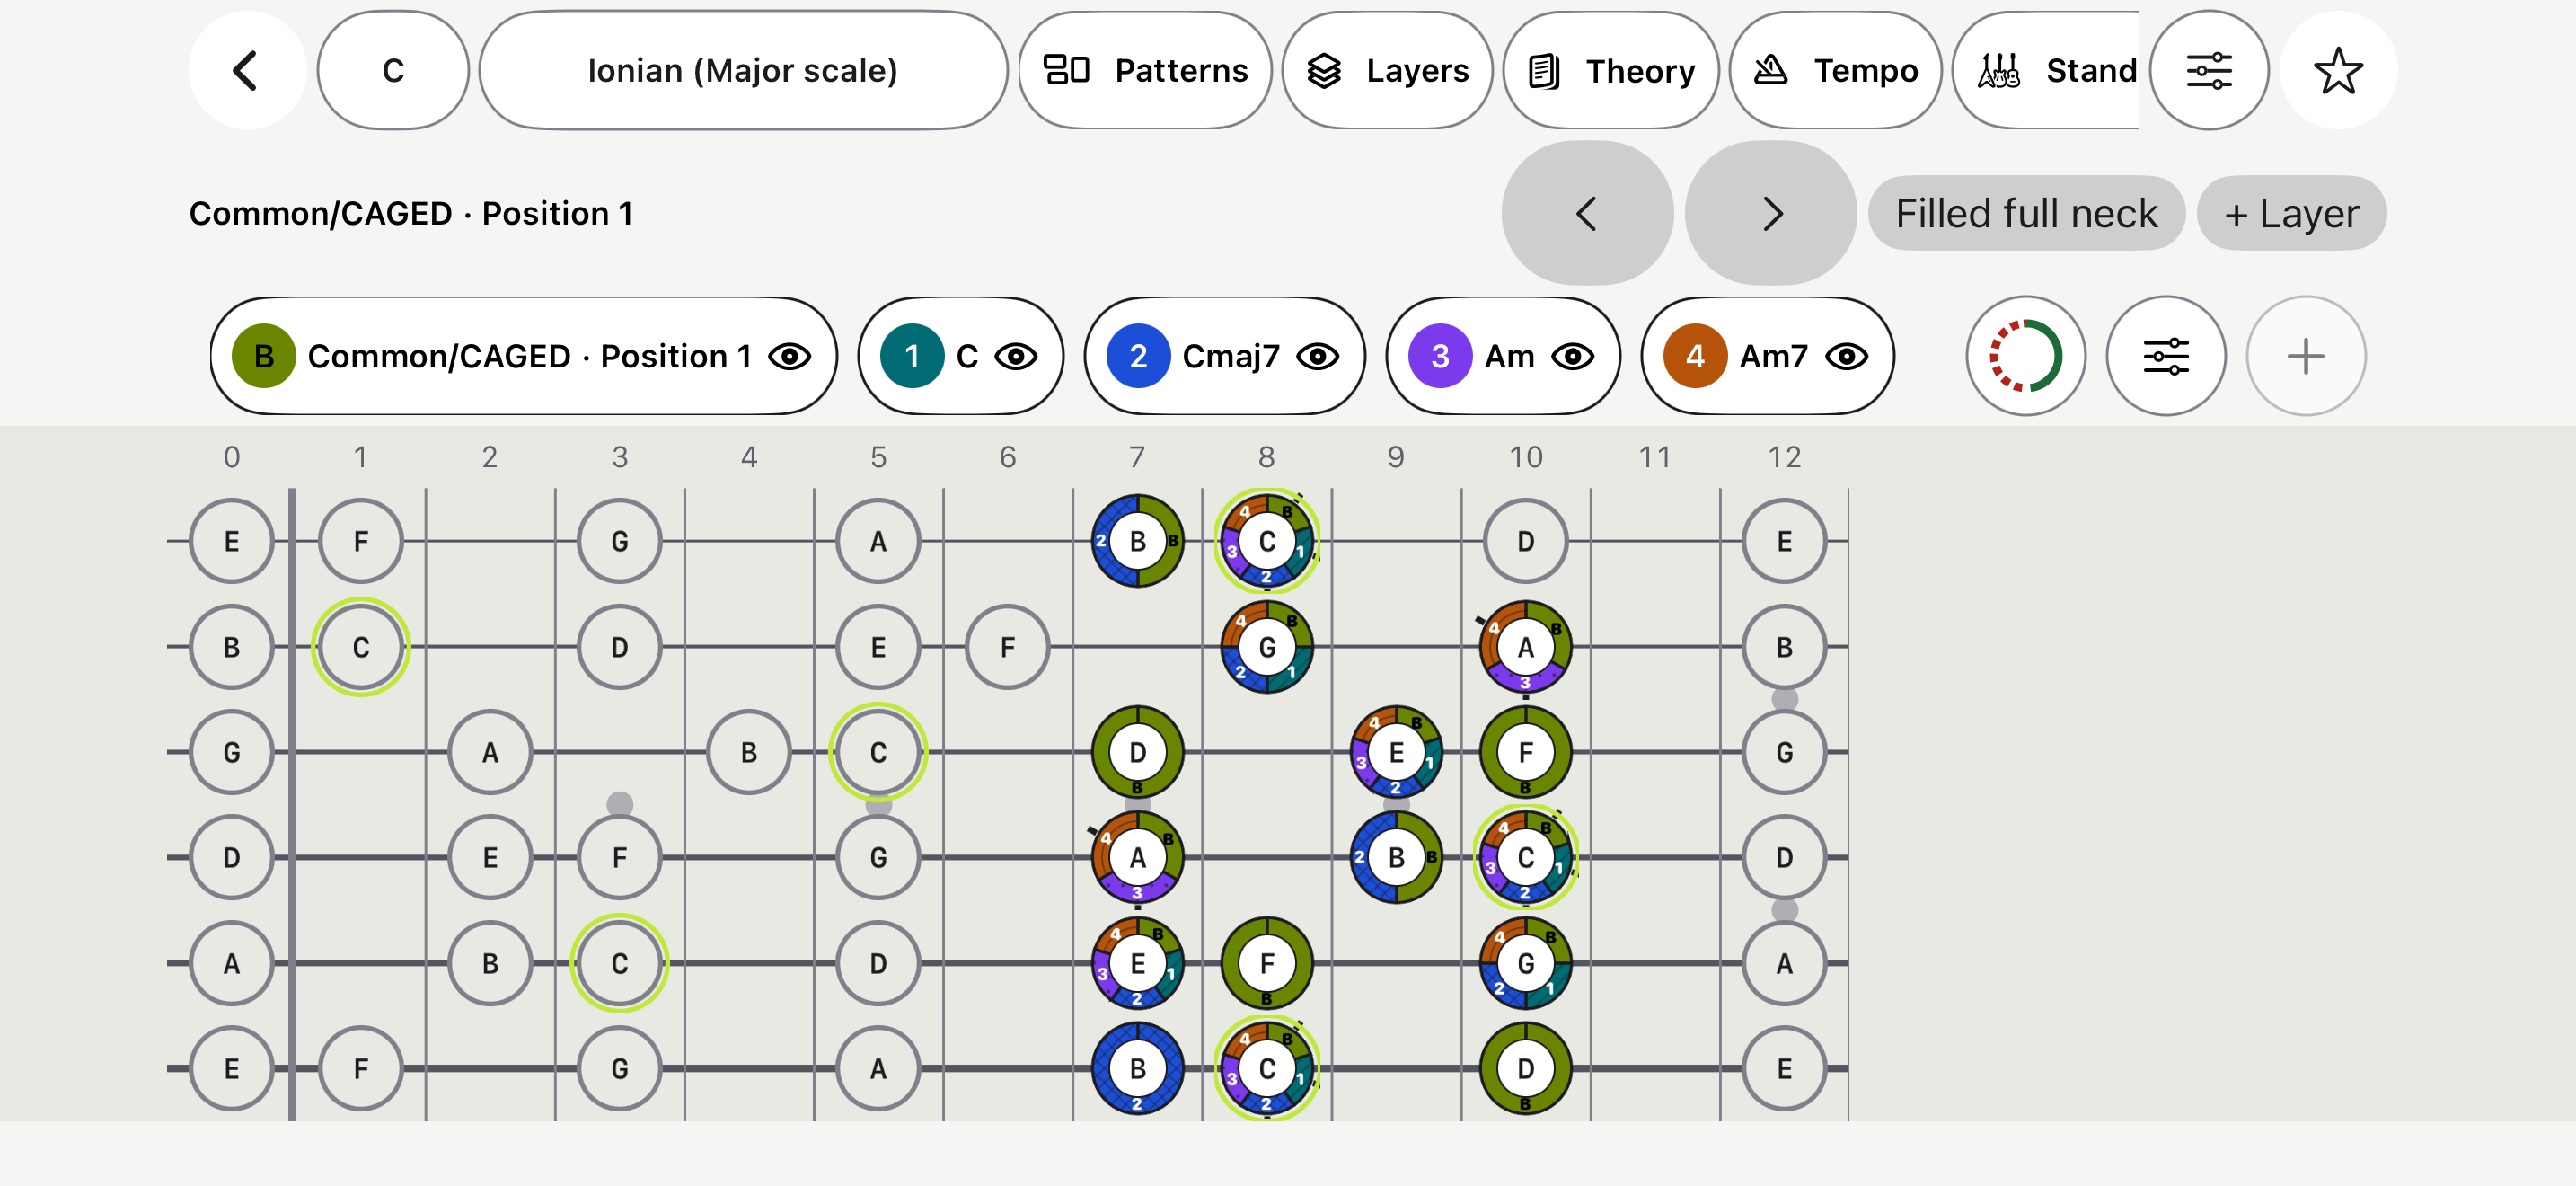
Explorer Layers comparing a base position and several musical sources

Screenshot: Explorer Layers comparing a base position and several musical sources.
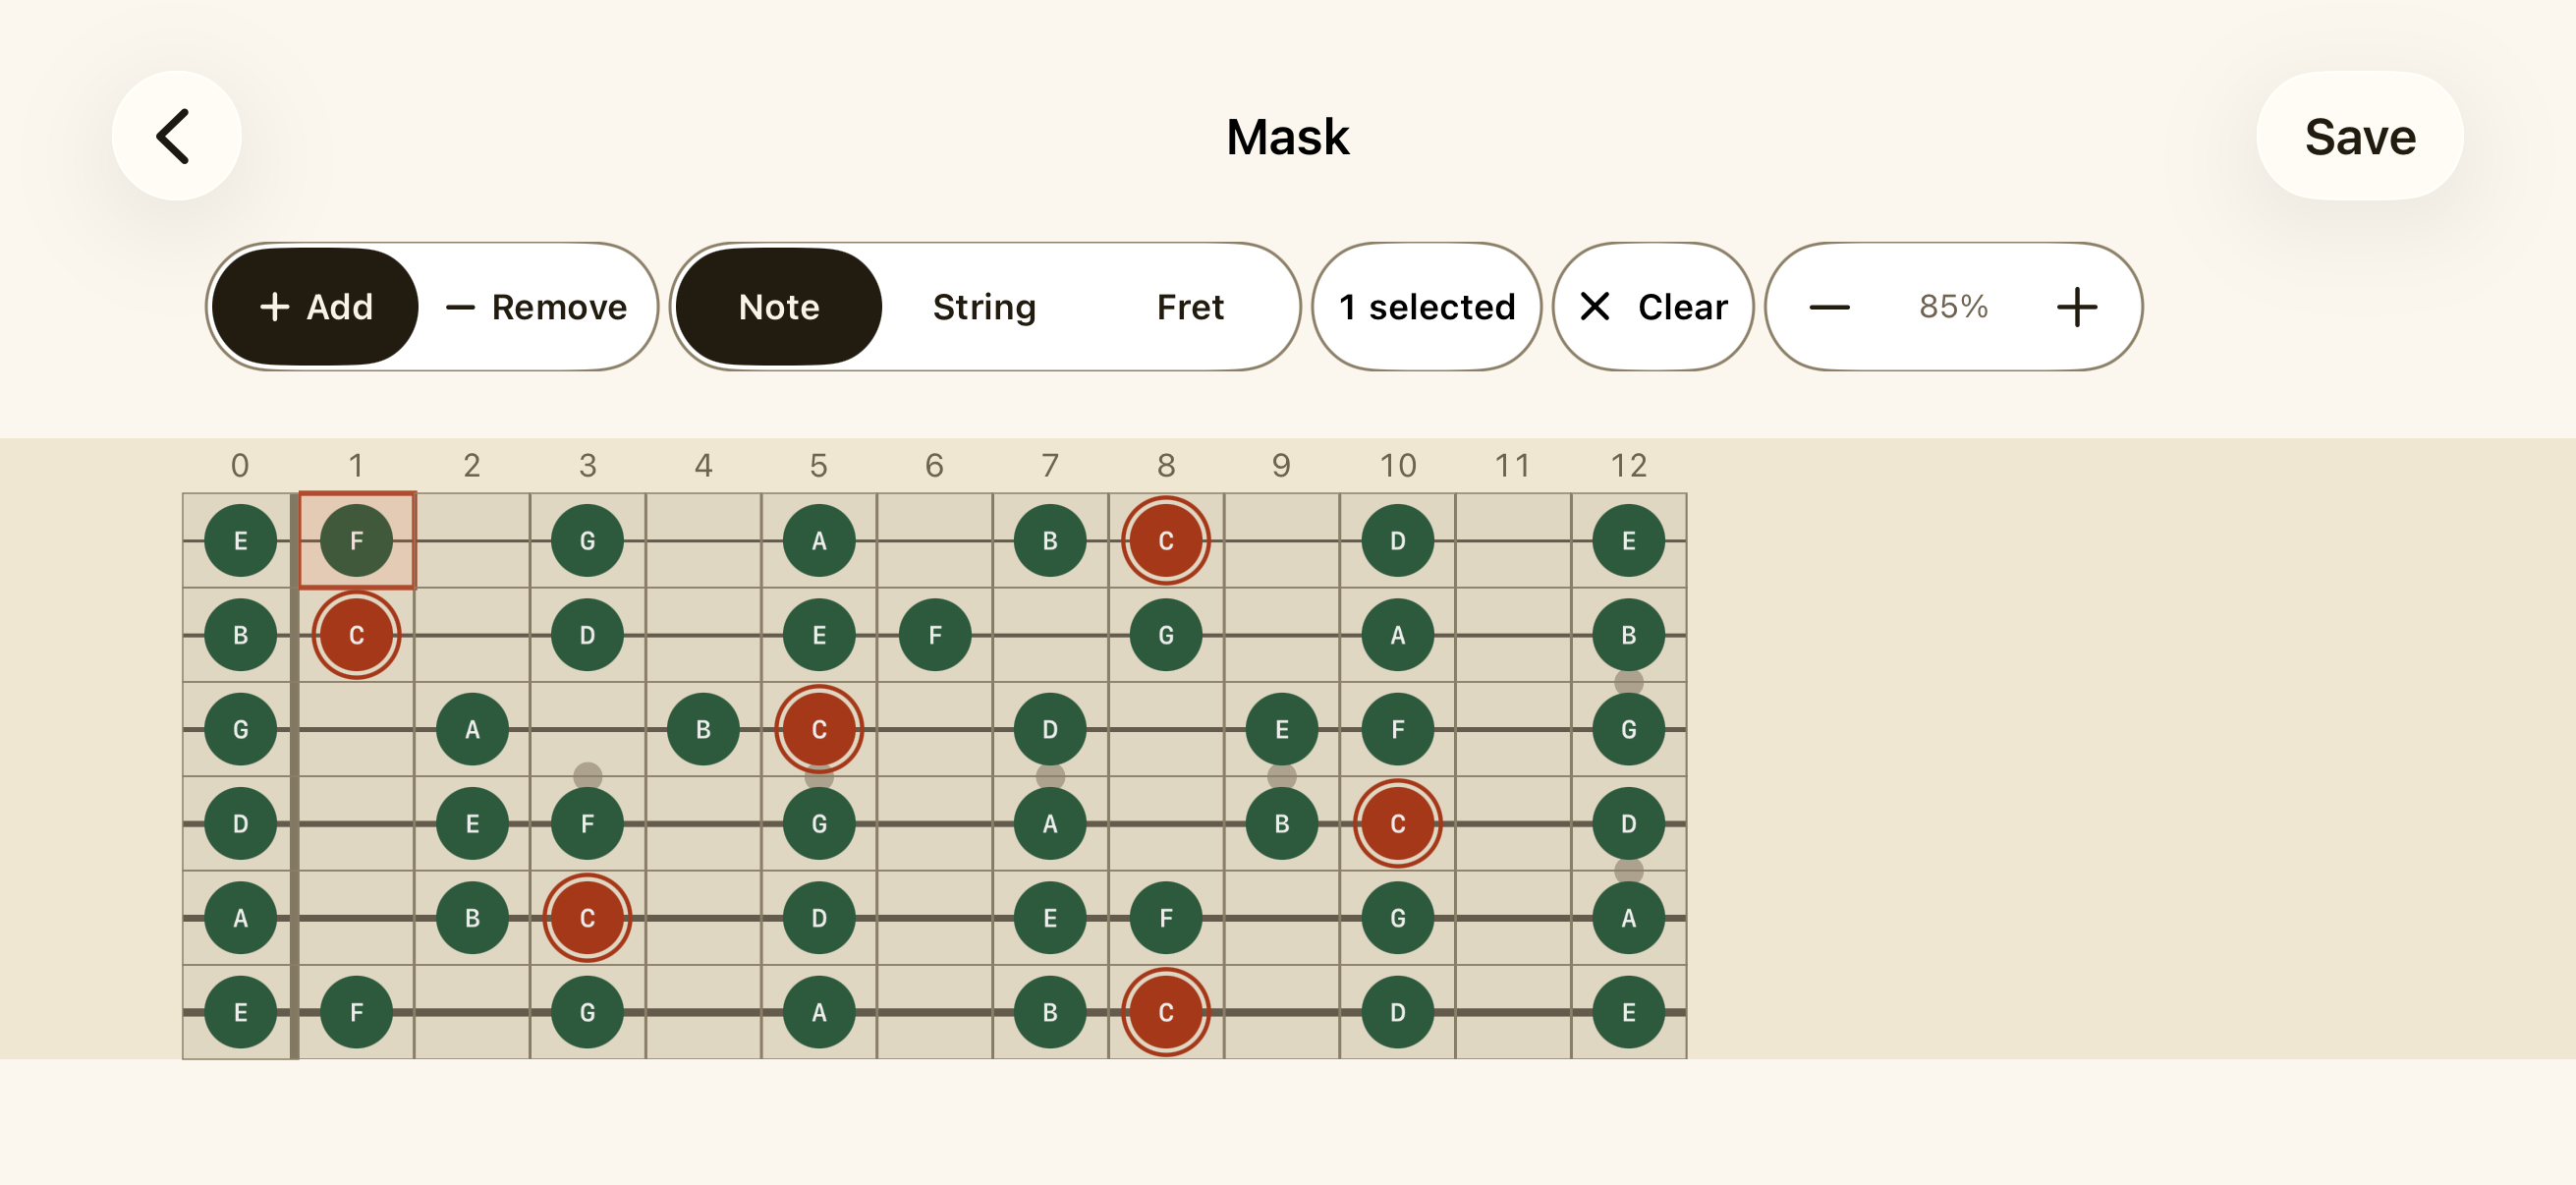
Mask editor showing Add and Remove operations, Note String and Fret scopes, selection count, Clear, zoom, and one selected fretboard cell

In the Mask editor, choose Add or Remove, set the scope, and tap the neck.
FreeGuide 05

Stop counting frets one by one

How do I stop counting frets and recognise notes directly?

  1. 1

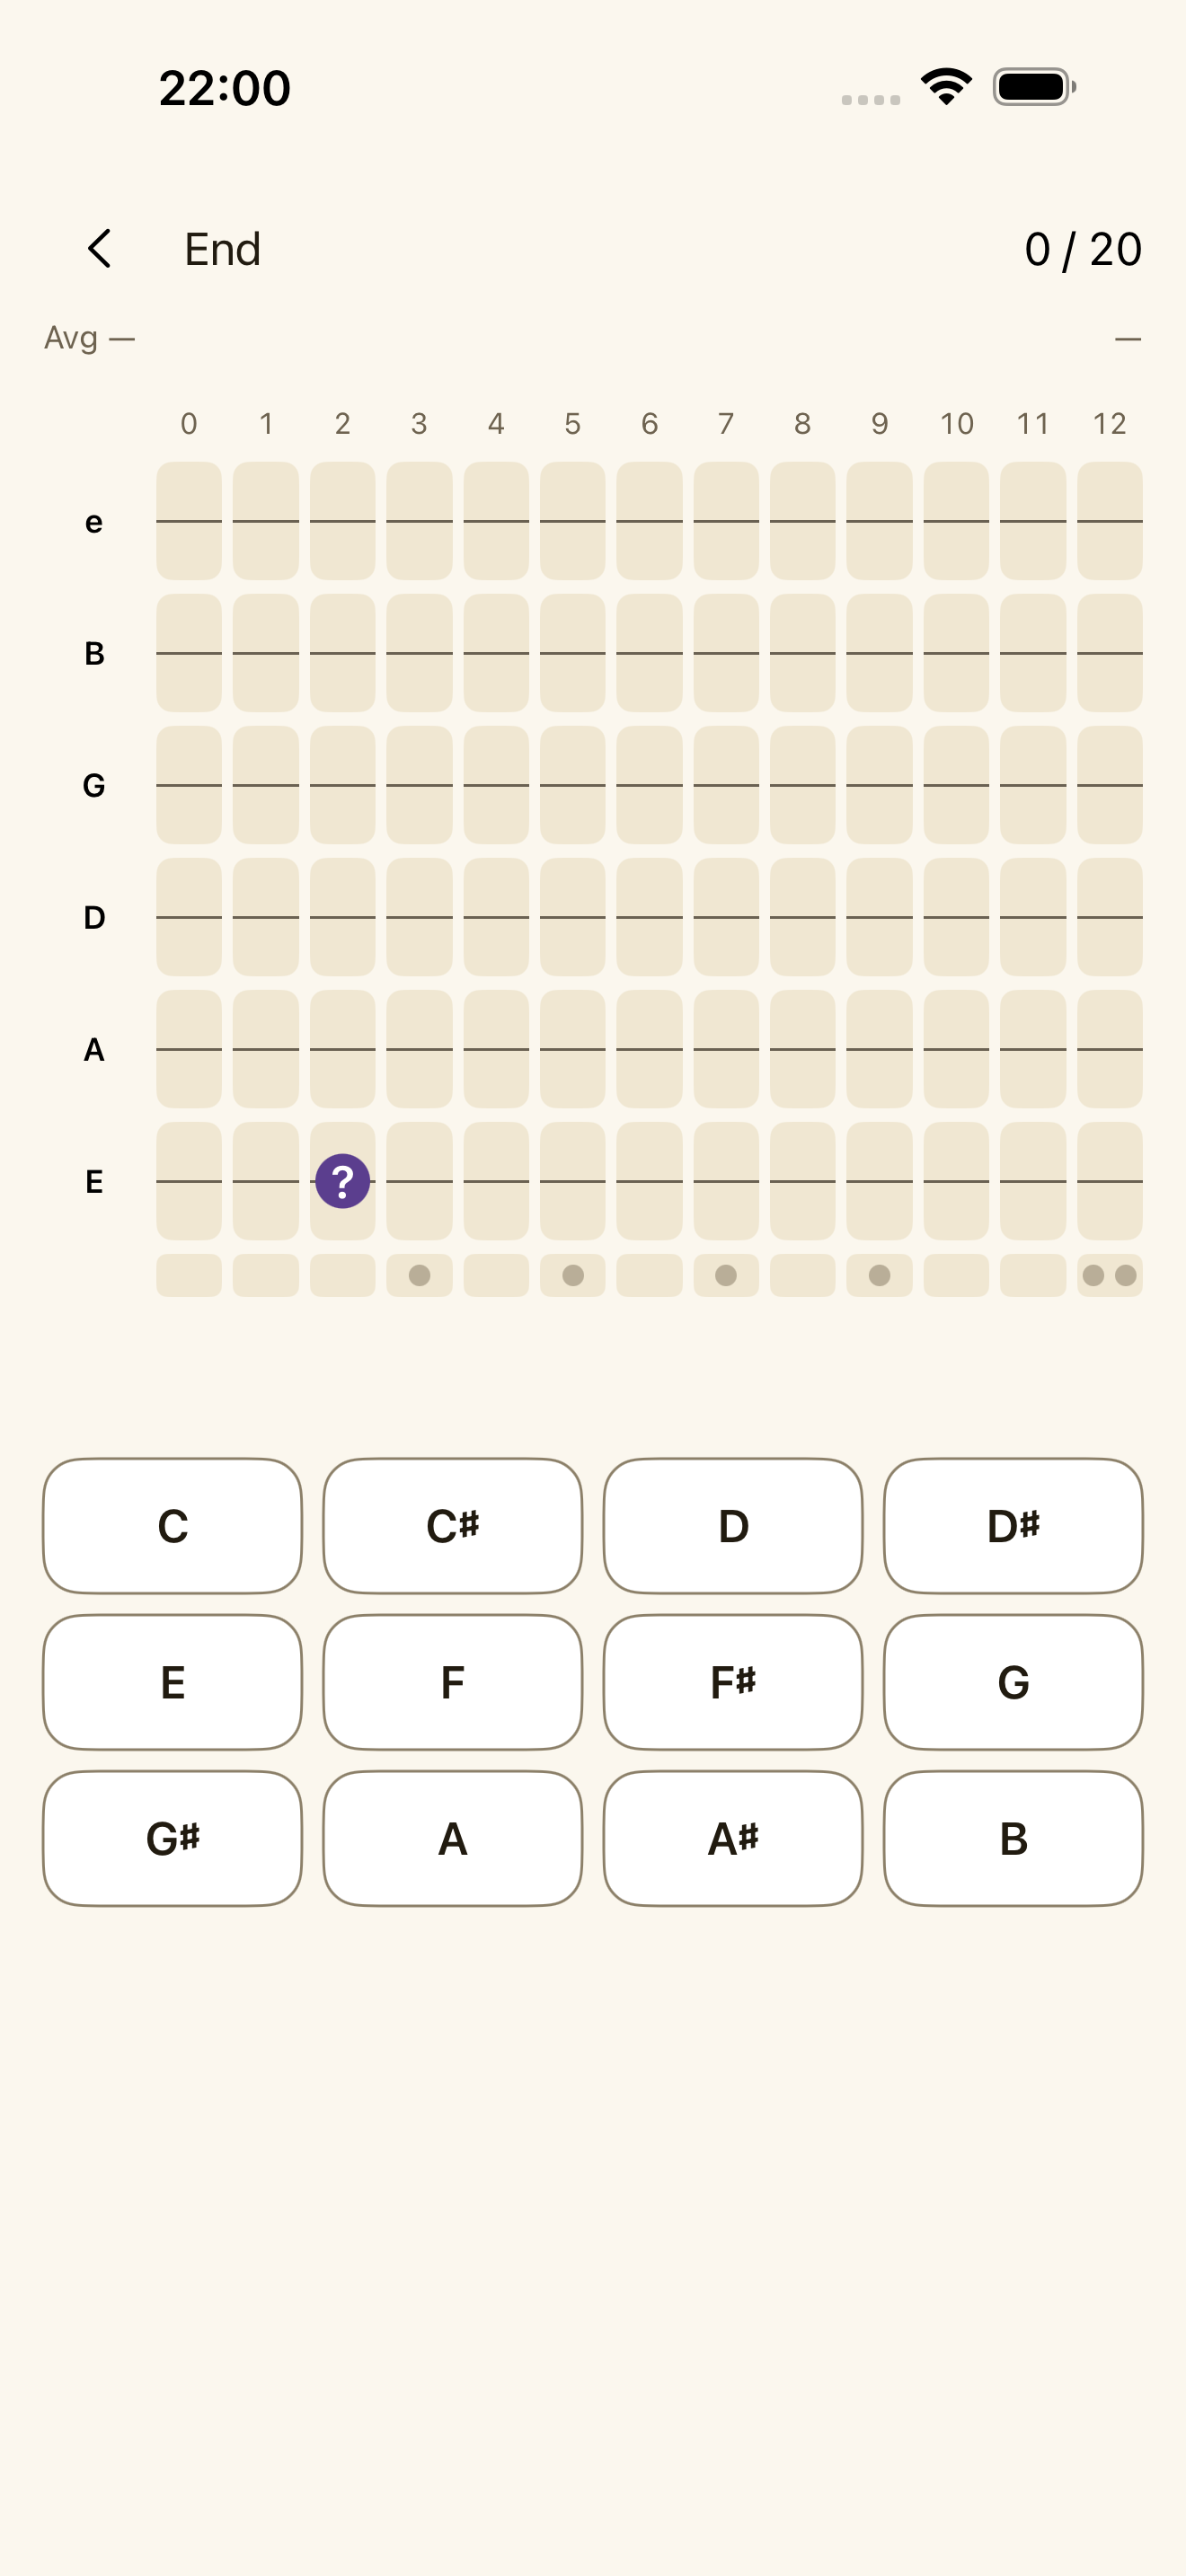
    Open Trainer and pick an activity. You can find one note, find all of its locations, build intervals or scales, complete a shape, or use the classic note quiz.

  2. 2

    Begin with one or two strings and a fret range that feels manageable. Add more when your answers become reliable.

  3. 3

    Reveal Mode helps while an area is still new. Turn it off when you want to test recall without clues.

  4. 4

    In Play Mode, choose the note pool and timer, allow microphone access, and play the requested note anywhere in the accepted range.

  5. 5

    Use the speed and accuracy history to find weak strings or positions. One unusually good session matters less than a pattern across several attempts.

What you should see

The exercise makes you recall and locate notes instead of reading them from a finished diagram.

Keep in mind

Play Mode matches pitch, not fingering. Room noise, an out-of-tune instrument, or octave ambiguity can delay a match.

NeckPilot Trainer asking for a note on the fretboard

Screenshot: NeckPilot Trainer asking for a note on the fretboard.

ProGuide 06

See what sits inside one pentatonic box

How does one pentatonic box connect to the full scale and the chords inside it?

  1. 1

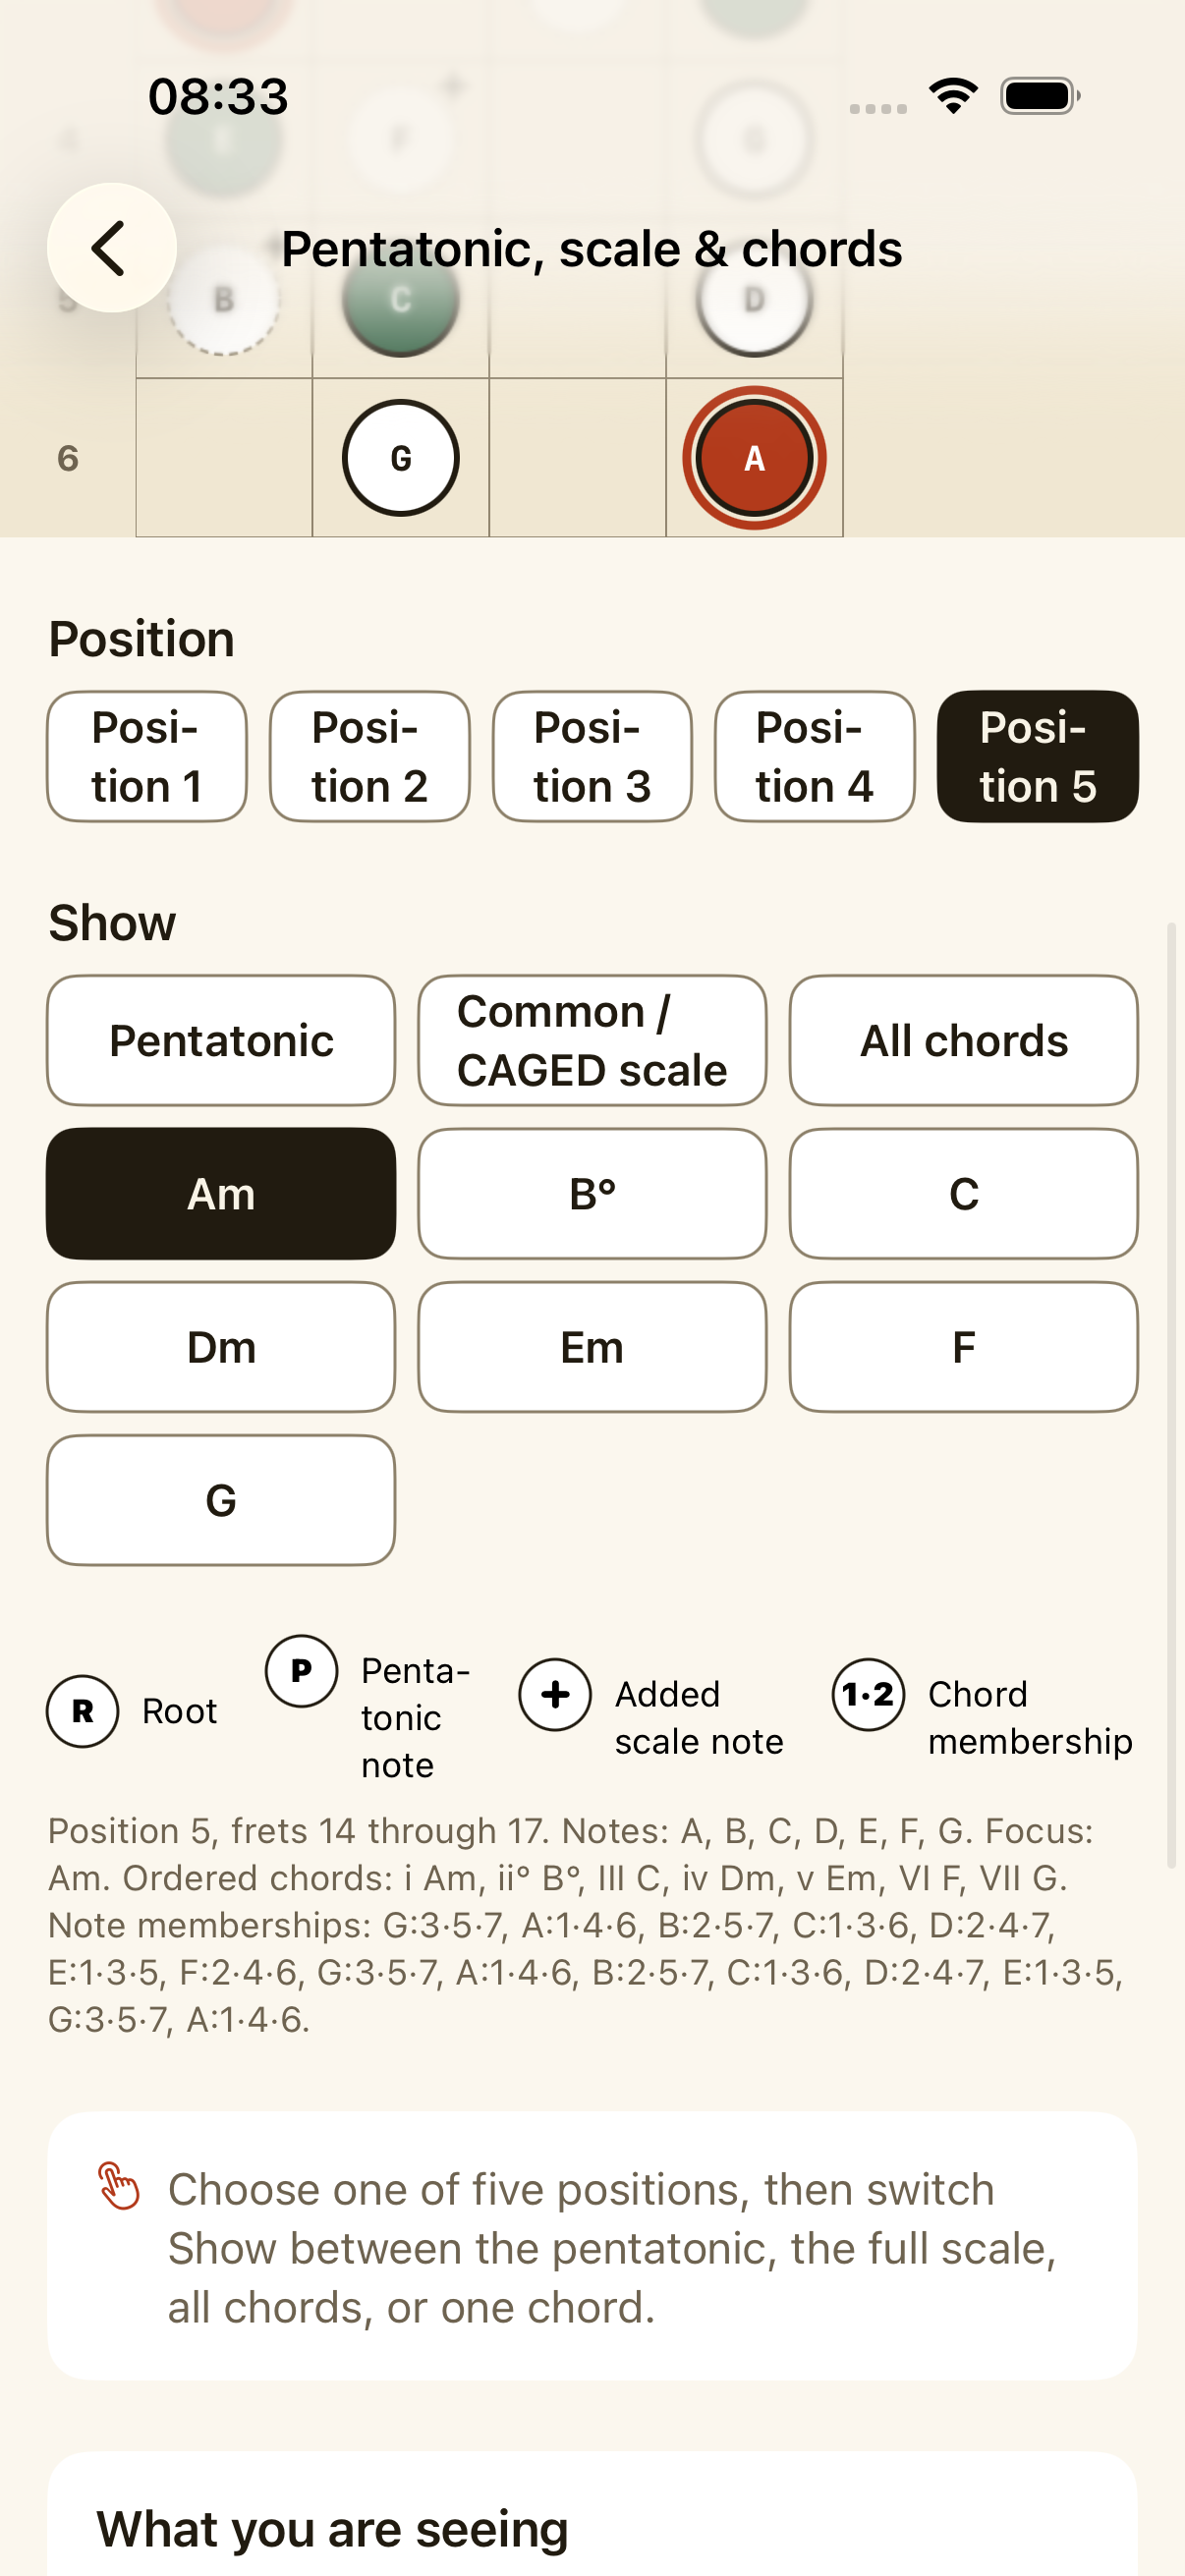
    Open Learn and choose Pentatonic, Scale & Chords.

  2. 2

    Pick one of the five positions. Show the pentatonic shape first, then switch to its parent scale without moving to another part of the neck.

  3. 3

    Choose a chord to reveal its tones inside the same position. The explanation below the fretboard changes with your selection.

  4. 4

    Relative Roots compares minor and major tonics over the same notes. Progression Targeting steps through C-G-Am-F.

  5. 5

    Triads by string set covers strings 1-2-3, 2-3-4, 3-4-5, 4-5-6, or all strings. Read the inversion label because a shape is not always in root position.

What you should see

The same area of the neck stays on screen while you change what its notes mean.

Keep in mind

Learn is an interactive reference. It does not have a fixed lesson order or scores. These connection views use Standard six-string guitar.

Interactive Learn view connecting pentatonic, scale, and chords

Screenshot: Interactive Learn view connecting pentatonic, scale, and chords.

Free + ProGuide 07

Follow C-G-Am-F on the fretboard

How do I practise C-G-Am-F without losing the chord tones?

  1. 1

    Open Progressions. The Free library has major and minor patterns that can resolve at any tonic.

  2. 2

    With Pro, make a transposable degree pattern or enter the song chords directly. Add C, G, Am, and F, give the progression a name, and save it.

  3. 3

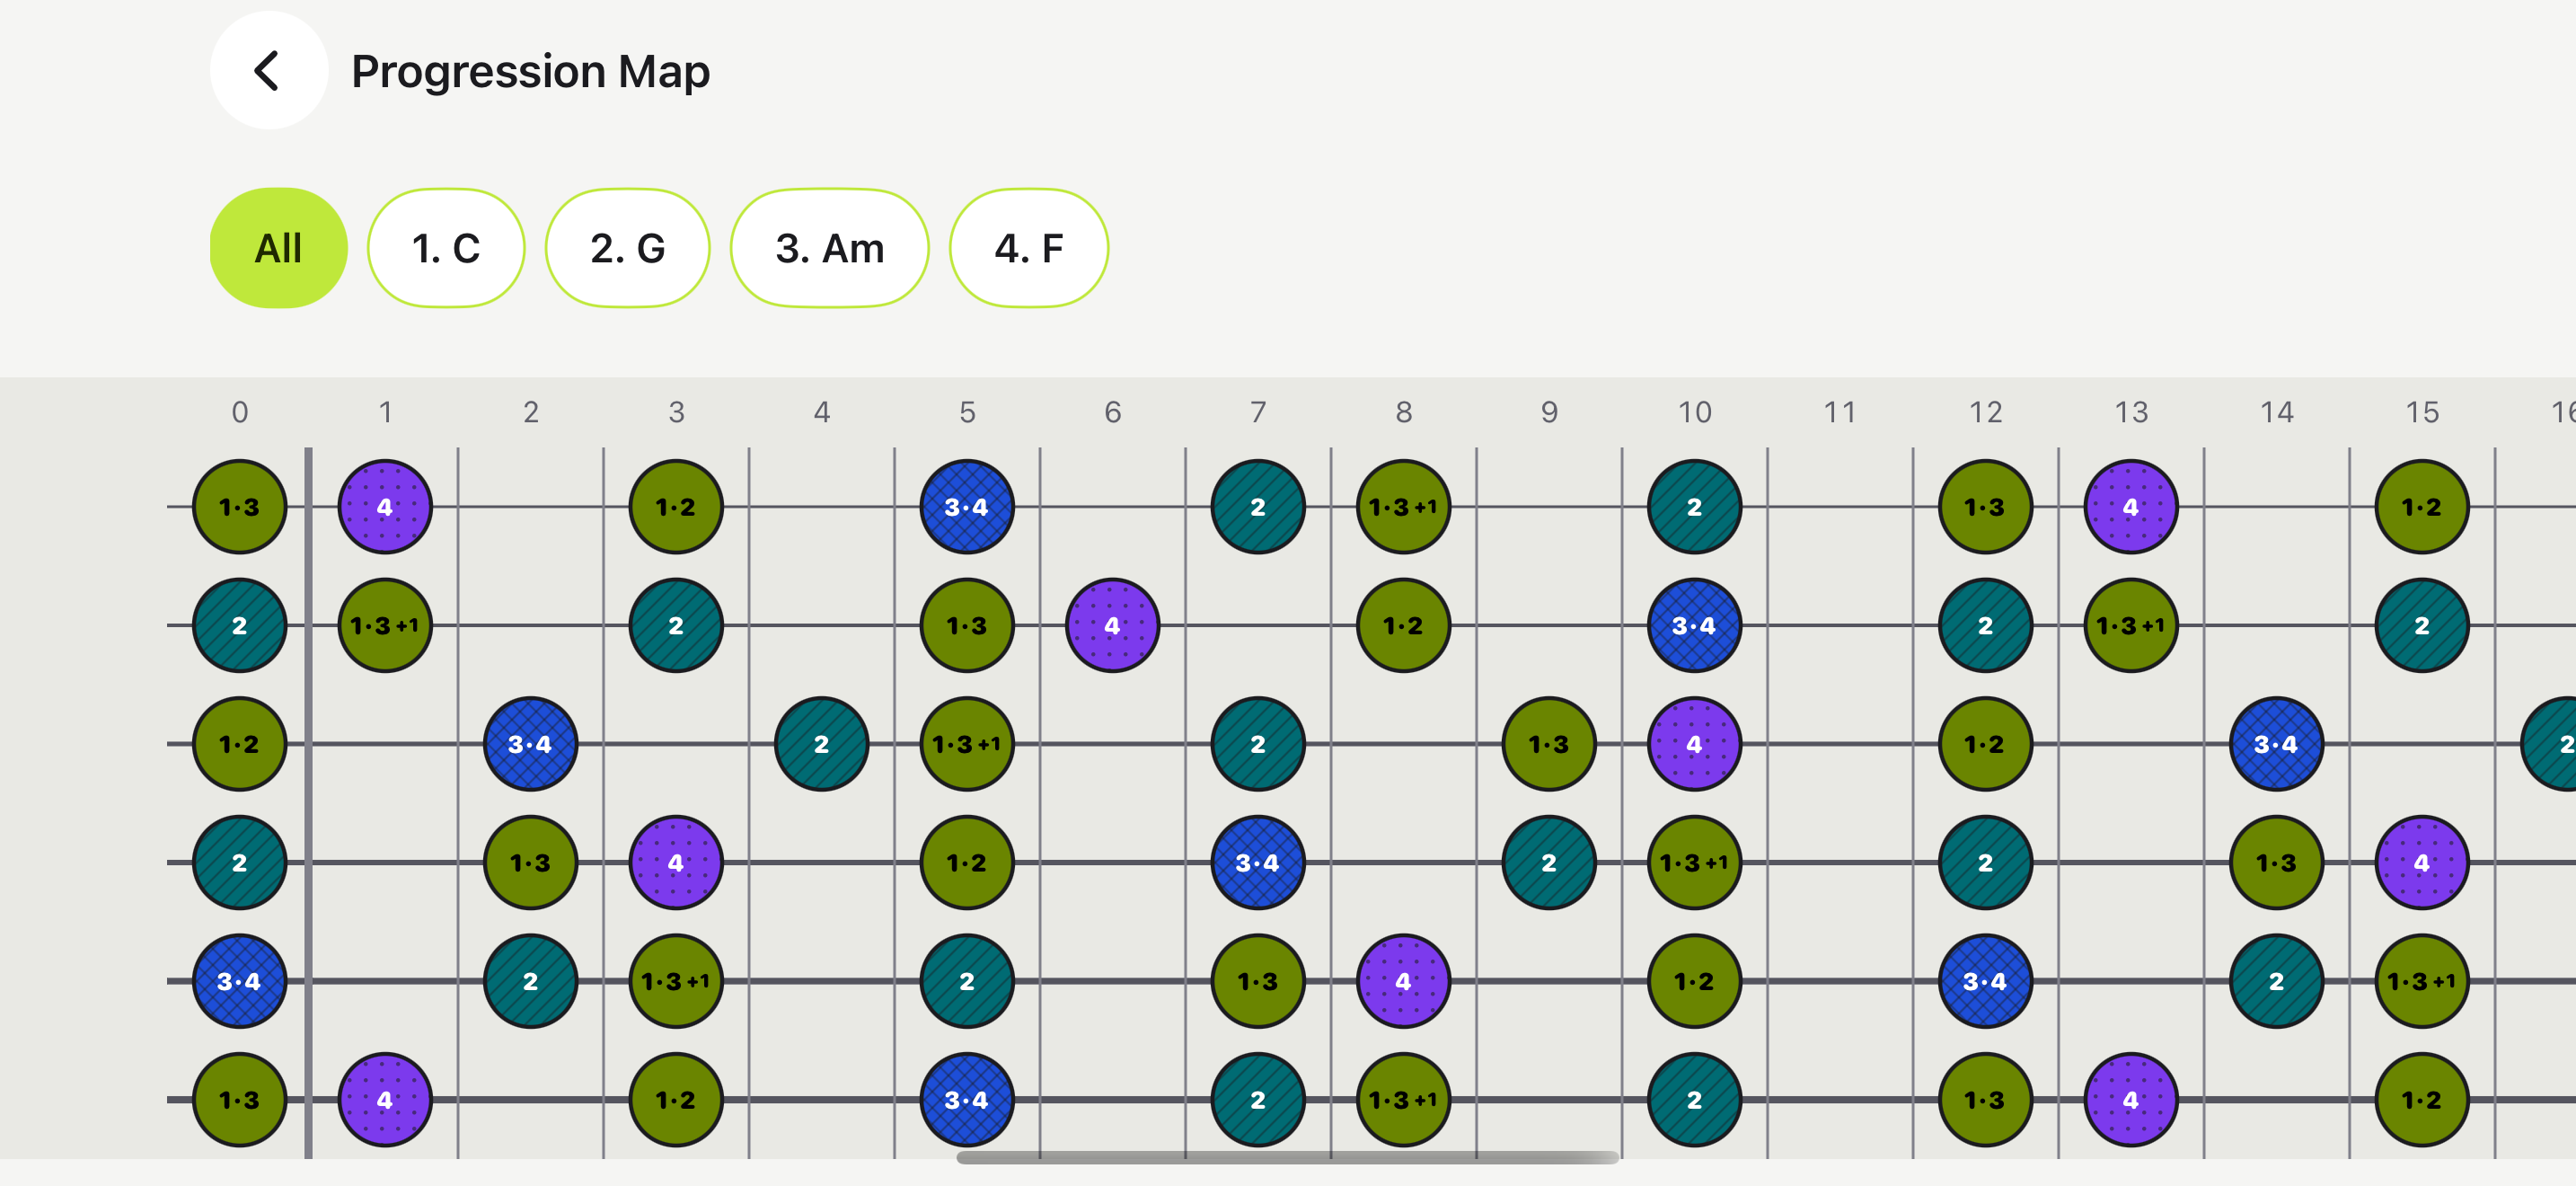
    Open Show all chords on fretboard. All shows the relationship between every chord. Choose one chord when the combined map gets too busy.

  4. 4

    Send the progression to the Metronome or Drum Machine and choose how many full bars each chord lasts.

  5. 5

    Start playback. Explorer changes the visible chord at the bar boundary while the beat keeps playing.

What you should see

The current chord changes on the neck as the progression moves forward, which makes nearby chord tones easier to follow.

Keep in mind

You will hear only the click or drum pattern. NeckPilot does not play chord, bass, pad, or strum accompaniment. A progression entered with explicit chord names does not transpose automatically.

C G A minor F shown together in Progression Map

Screenshot: C G A minor F shown together in Progression Map.

Free + ProGuide 08

Understand the markers and find a fingering

I can see the markers. How do I understand and finger them?

  1. 1

    Open Theory from Home. You can also open the Guide that belongs to the scale, chord, or arpeggio already shown in Explorer.

  2. 2

    The Free sections explain spelling, intervals, degrees, functions, the formula, and related material.

  3. 3

    With Pro, open Practice tips or Fingering & tab for a validated built-in position.

  4. 4

    Compare the finger numbers on the fretboard with the ascending and descending tab and staff exercise.

  5. 5

    If the notation graphic is difficult to read, switch to the accessible event sequence. It lists the same notes in order as text.

What you should see

The Guide connects the formula and degree names with harmony, a fingering, and an exercise you can play in order.

Keep in mind

Applied fingering and notation appear only when the active instrument setup and selected built-in position have validated content.

A Scale Guide with degrees, theory, and applied practice sections

Screenshot: A Scale Guide with degrees, theory, and applied practice sections.

FreeGuide 09

Tune first, then estimate a song’s key

What key might this progression be in, and how do I explore it?

  1. 1

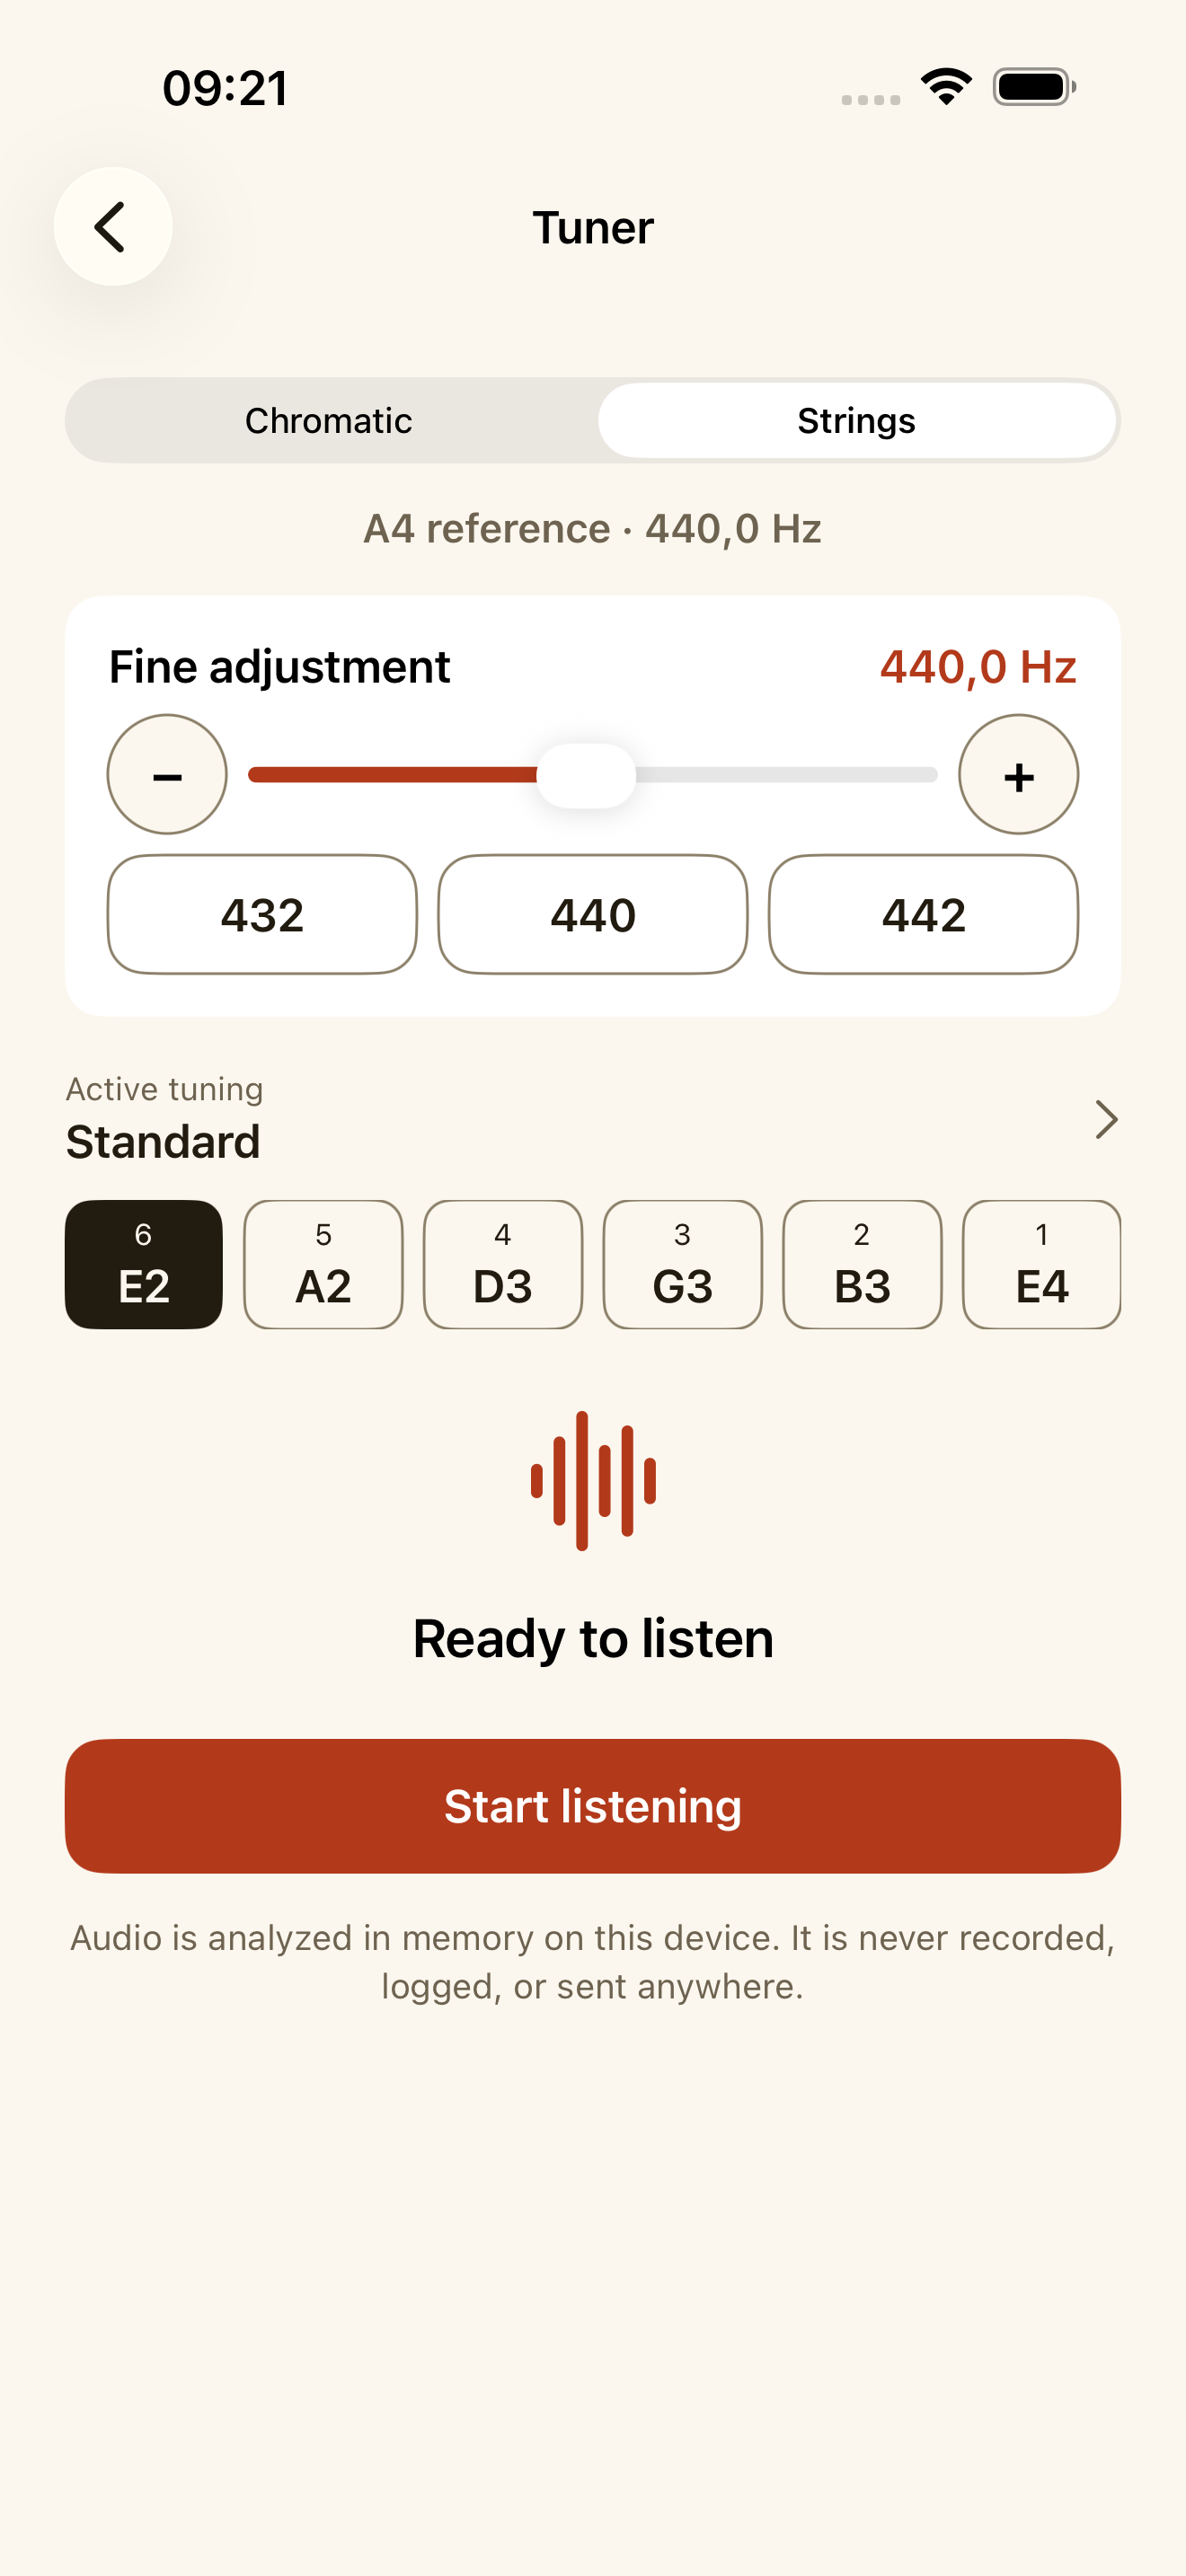
    Open Tuner, choose Chromatic or Strings, and tap Start. Play one clean note and follow the cents display until it settles in tune.

  2. 2

    Stop Tuner and open Key Finder. Play a steady major or minor progression for 10 to 15 seconds. A single note is not enough.

  3. 3

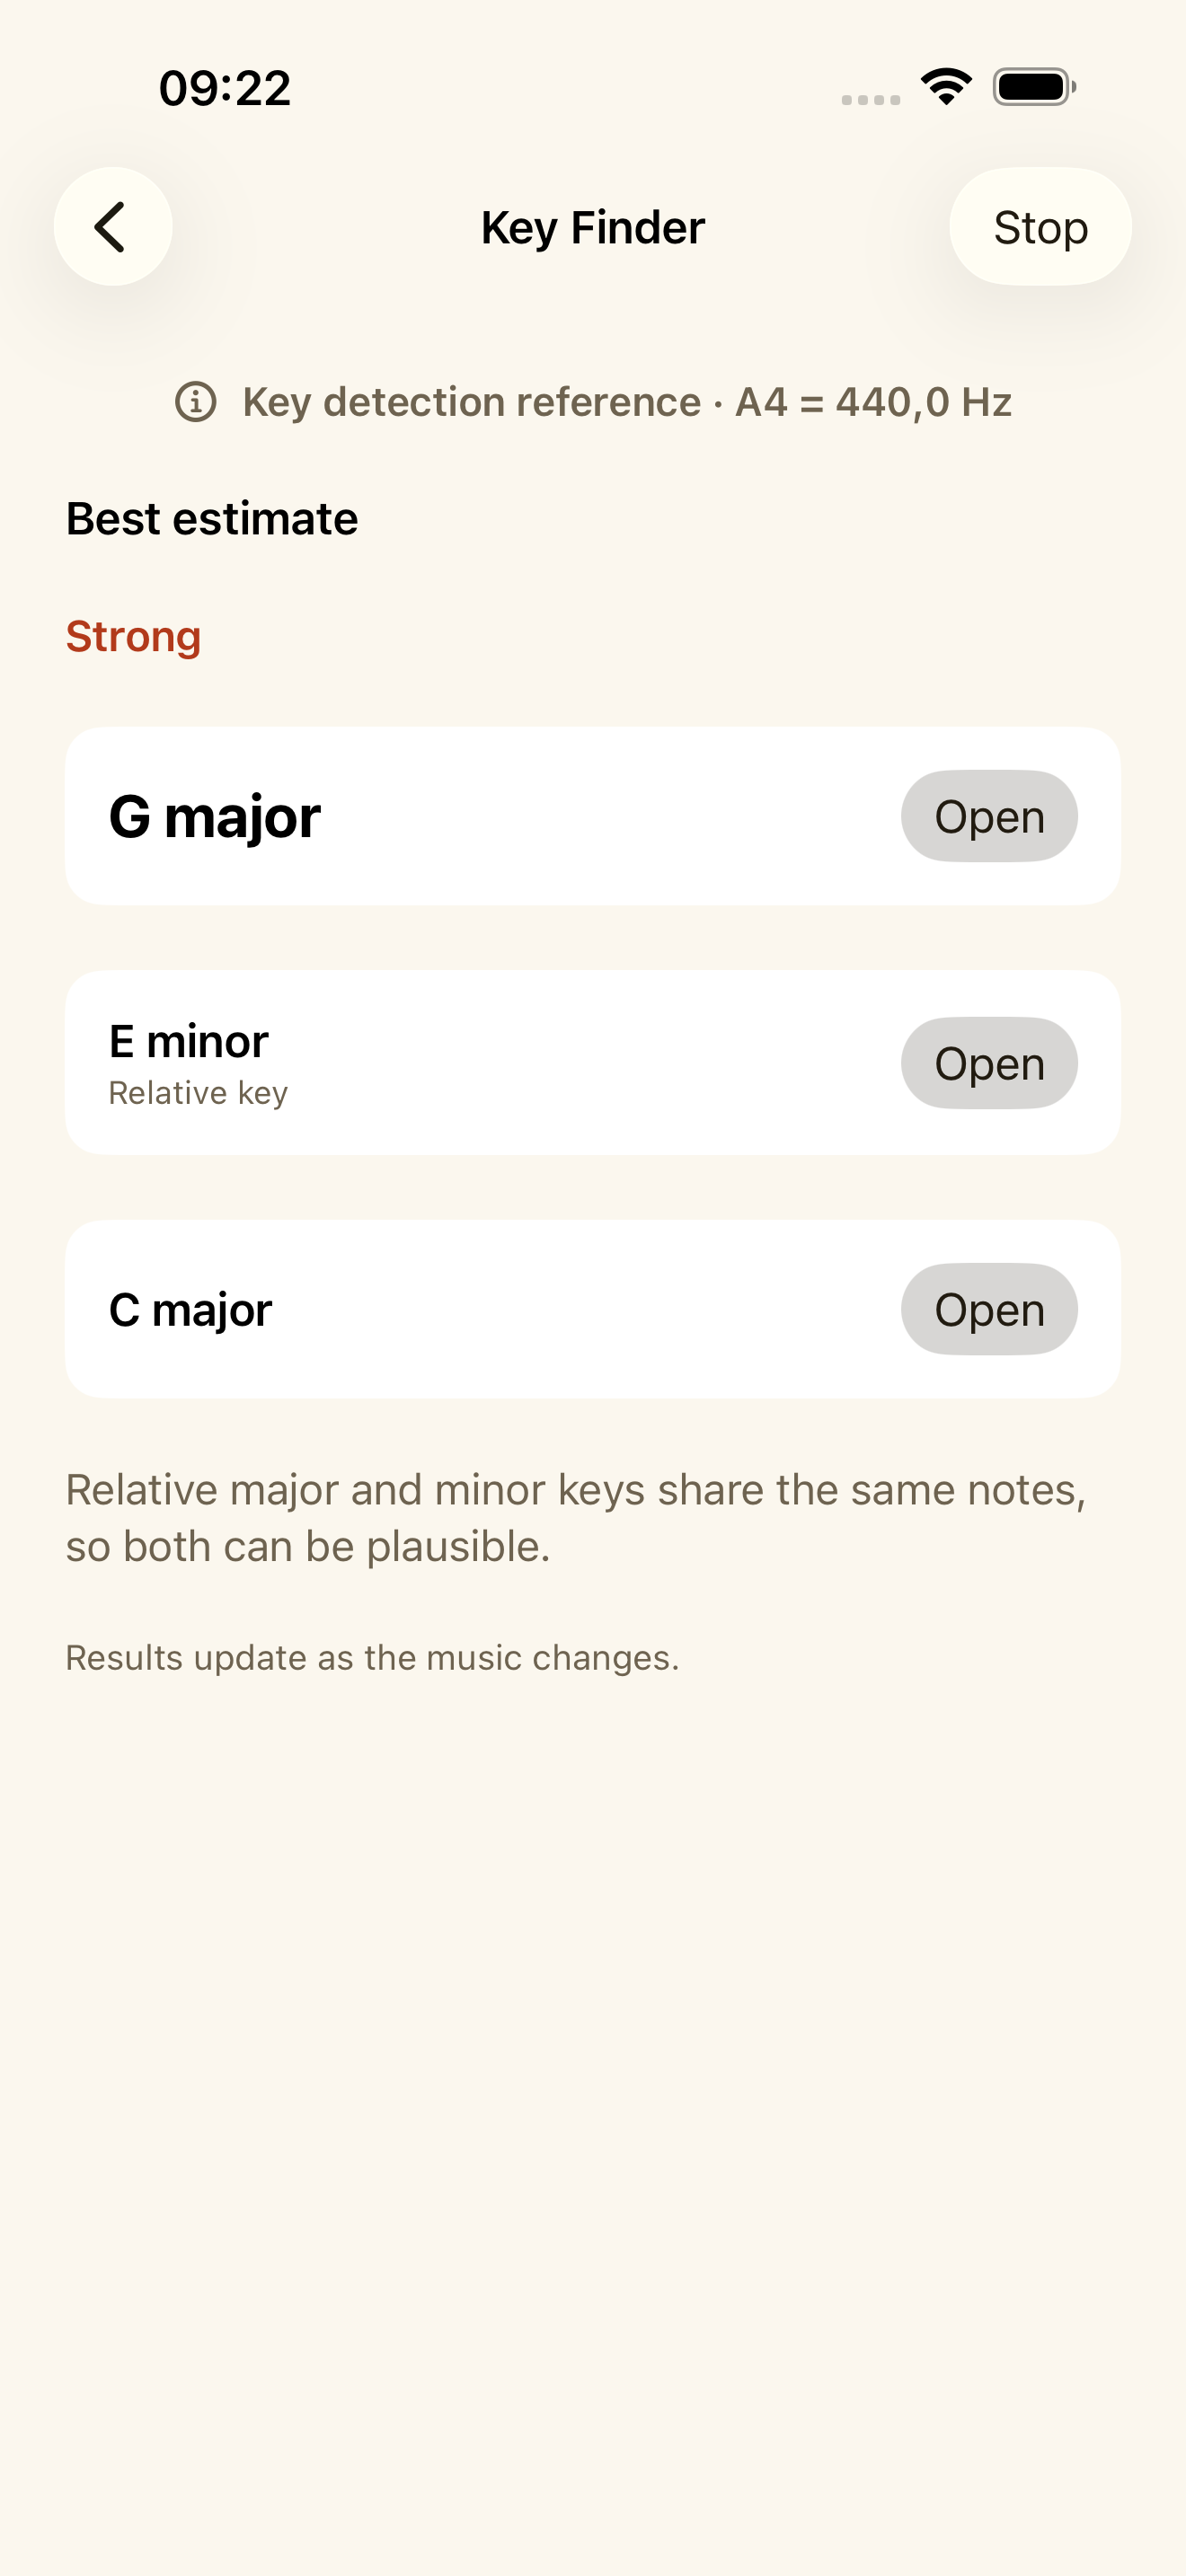
    Give the app time to hear enough tonal information. Then compare the three candidates and their Strong, Possible, or Uncertain labels.

  4. 4

    Relative major and minor may both appear. Choose the candidate that sounds plausible and open its root and scale in Explorer.

What you should see

Key Finder gives you a short list to check. You can send any candidate straight to the fretboard.

Keep in mind

Key Finder estimates. Noise, borrowed chords, a key change, or relative major and minor can leave more than one reasonable answer. The app analyses audio live and does not record or upload it.

NeckPilot Key Finder showing ranked possible keys

Screenshot: NeckPilot Key Finder showing ranked possible keys.

FreeGuide 10

Practise with a click or a drum beat

How do I keep a steady pulse while moving through the app?

  1. 1

    Open Metronome. Enter the BPM or use Tap Tempo, then set the meter, subdivision, click sound, and accents.

  2. 2

    For a groove, open Drum Machine and switch steps on for kick, snare, hi-hat, and clap. Try kick on 1 and 3, snare on 2 and 4, and eighth-note hi-hats.

  3. 3

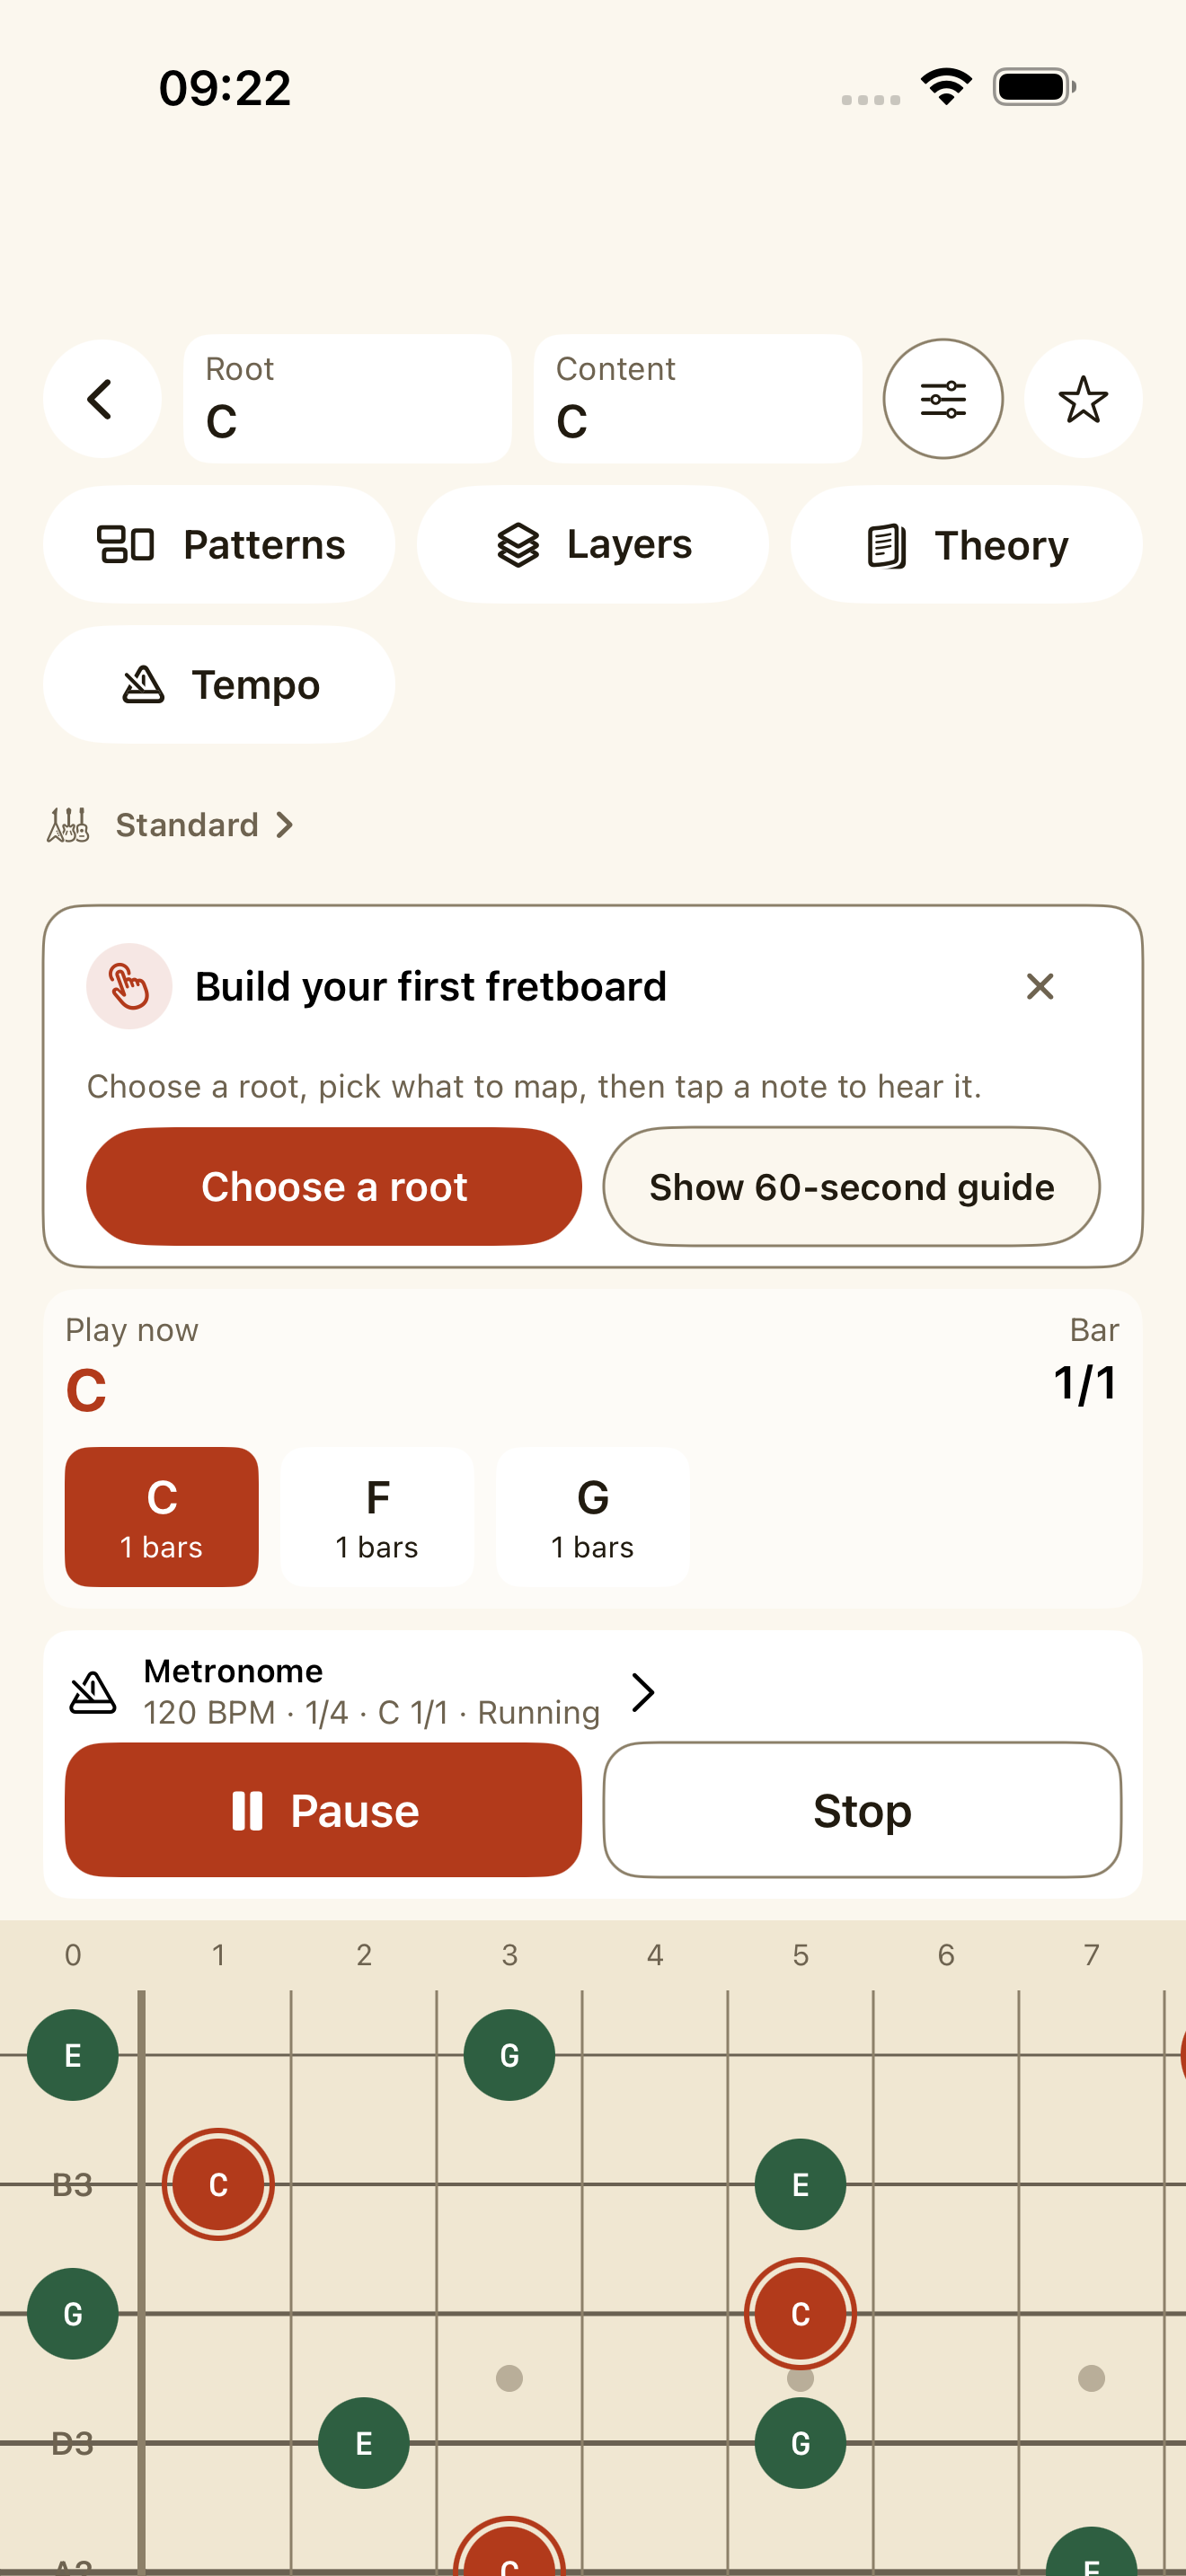
    Start playback and move to another part of the app. The transport remains visible for pause, resume, stop, and reopening the full tool.

  4. 4

    Explorer has a Tempo menu for quick changes while the fretboard stays on screen.

  5. 5

    Pro progression practice and timed Layers can use those same beat boundaries to change what is visible.

What you should see

The click or drum pattern keeps playing while you work with the fretboard or another practice view.

Keep in mind

Starting a microphone feature stops the Metronome or Drum Machine after permission and setup succeed. Playback may continue in the background, but microphone capture and unsaved in-session edits stop when expected.

A timed NeckPilot practice view following musical changes

Screenshot: A timed NeckPilot practice view following musical changes.

My narrated walkthrough

I switch between the Metronome and Drum Machine while practising A minor and G major.

ProGuide 11

Make NeckPilot match your instrument

I play seven-string, bass, ukulele, or 432 Hz. How do I align the app?

  1. 1

    Open Settings, then Instrument & tuning. Search the built-in catalog and choose the instrument family, number of strings, and tuning that match what you play.

  2. 2

    Check the vertical string order. Full neck, Trainer, Tuner targets, previews, and theory all use the active setup.

  3. 3

    If the catalog does not have your guitar tuning, create a custom one with 4 to 8 strings.

  4. 4

    Open Concert pitch for the 432, 440, and 442 Hz presets. You can also set any value from 415.0 to 466.2 Hz in 0.1 Hz steps.

  5. 5

    Return to Tuner and check the A4 reference before you begin tuning.

What you should see

The fretboard layout and tuning targets now match your instrument and reference pitch.

Keep in mind

Theory and Full neck remain available across setups. Positions, shapes, fingering, tab, and staff exercises depend on validated content for the chosen setup. Concert pitch changes frequency calibration. It does not change note names or temperament.

NeckPilot Tuner with a clear string and pitch target

Screenshot: NeckPilot Tuner with a clear string and pitch target.

Free + ProGuide 12

Adjust the app, share a Favorite, or start over

How do I make NeckPilot comfortable and keep control of my data?

  1. 1

    Settings has Light and Dark appearance, default labels, fret range, accidental fallback, handedness, and Play Mode timing. Change the app language in iOS Settings.

  2. 2

    Save an Explorer or progression setup to Favorites when you want to repeat it. A Favorite with content can be shared as a link. Opening the link rebuilds the view but does not save it automatically.

  3. 3

    A link to a Pro setup does not unlock Pro. NeckPilot also avoids exporting a broken link when another device would be unable to resolve local custom content.

  4. 4

    If you already own Pro, use Restore Purchases or Check Again. Apple StoreKit verifies the purchase; NeckPilot has no separate account.

  5. 5

    You can reset Trainer statistics, Favorites, custom patterns, or all local app data separately. Microphone permission remains under iOS Settings.

What you should see

The app uses your preferred layout and keeps repeatable setups easy to reopen. Restore and reset actions happen only when you choose them.

Keep in mind

Apple may include local data in a device or iCloud backup, depending on your settings. NeckPilot does not provide cloud sync, an account, analytics, or a server copy of your Favorites.

NeckPilot Free and Pro capability comparison

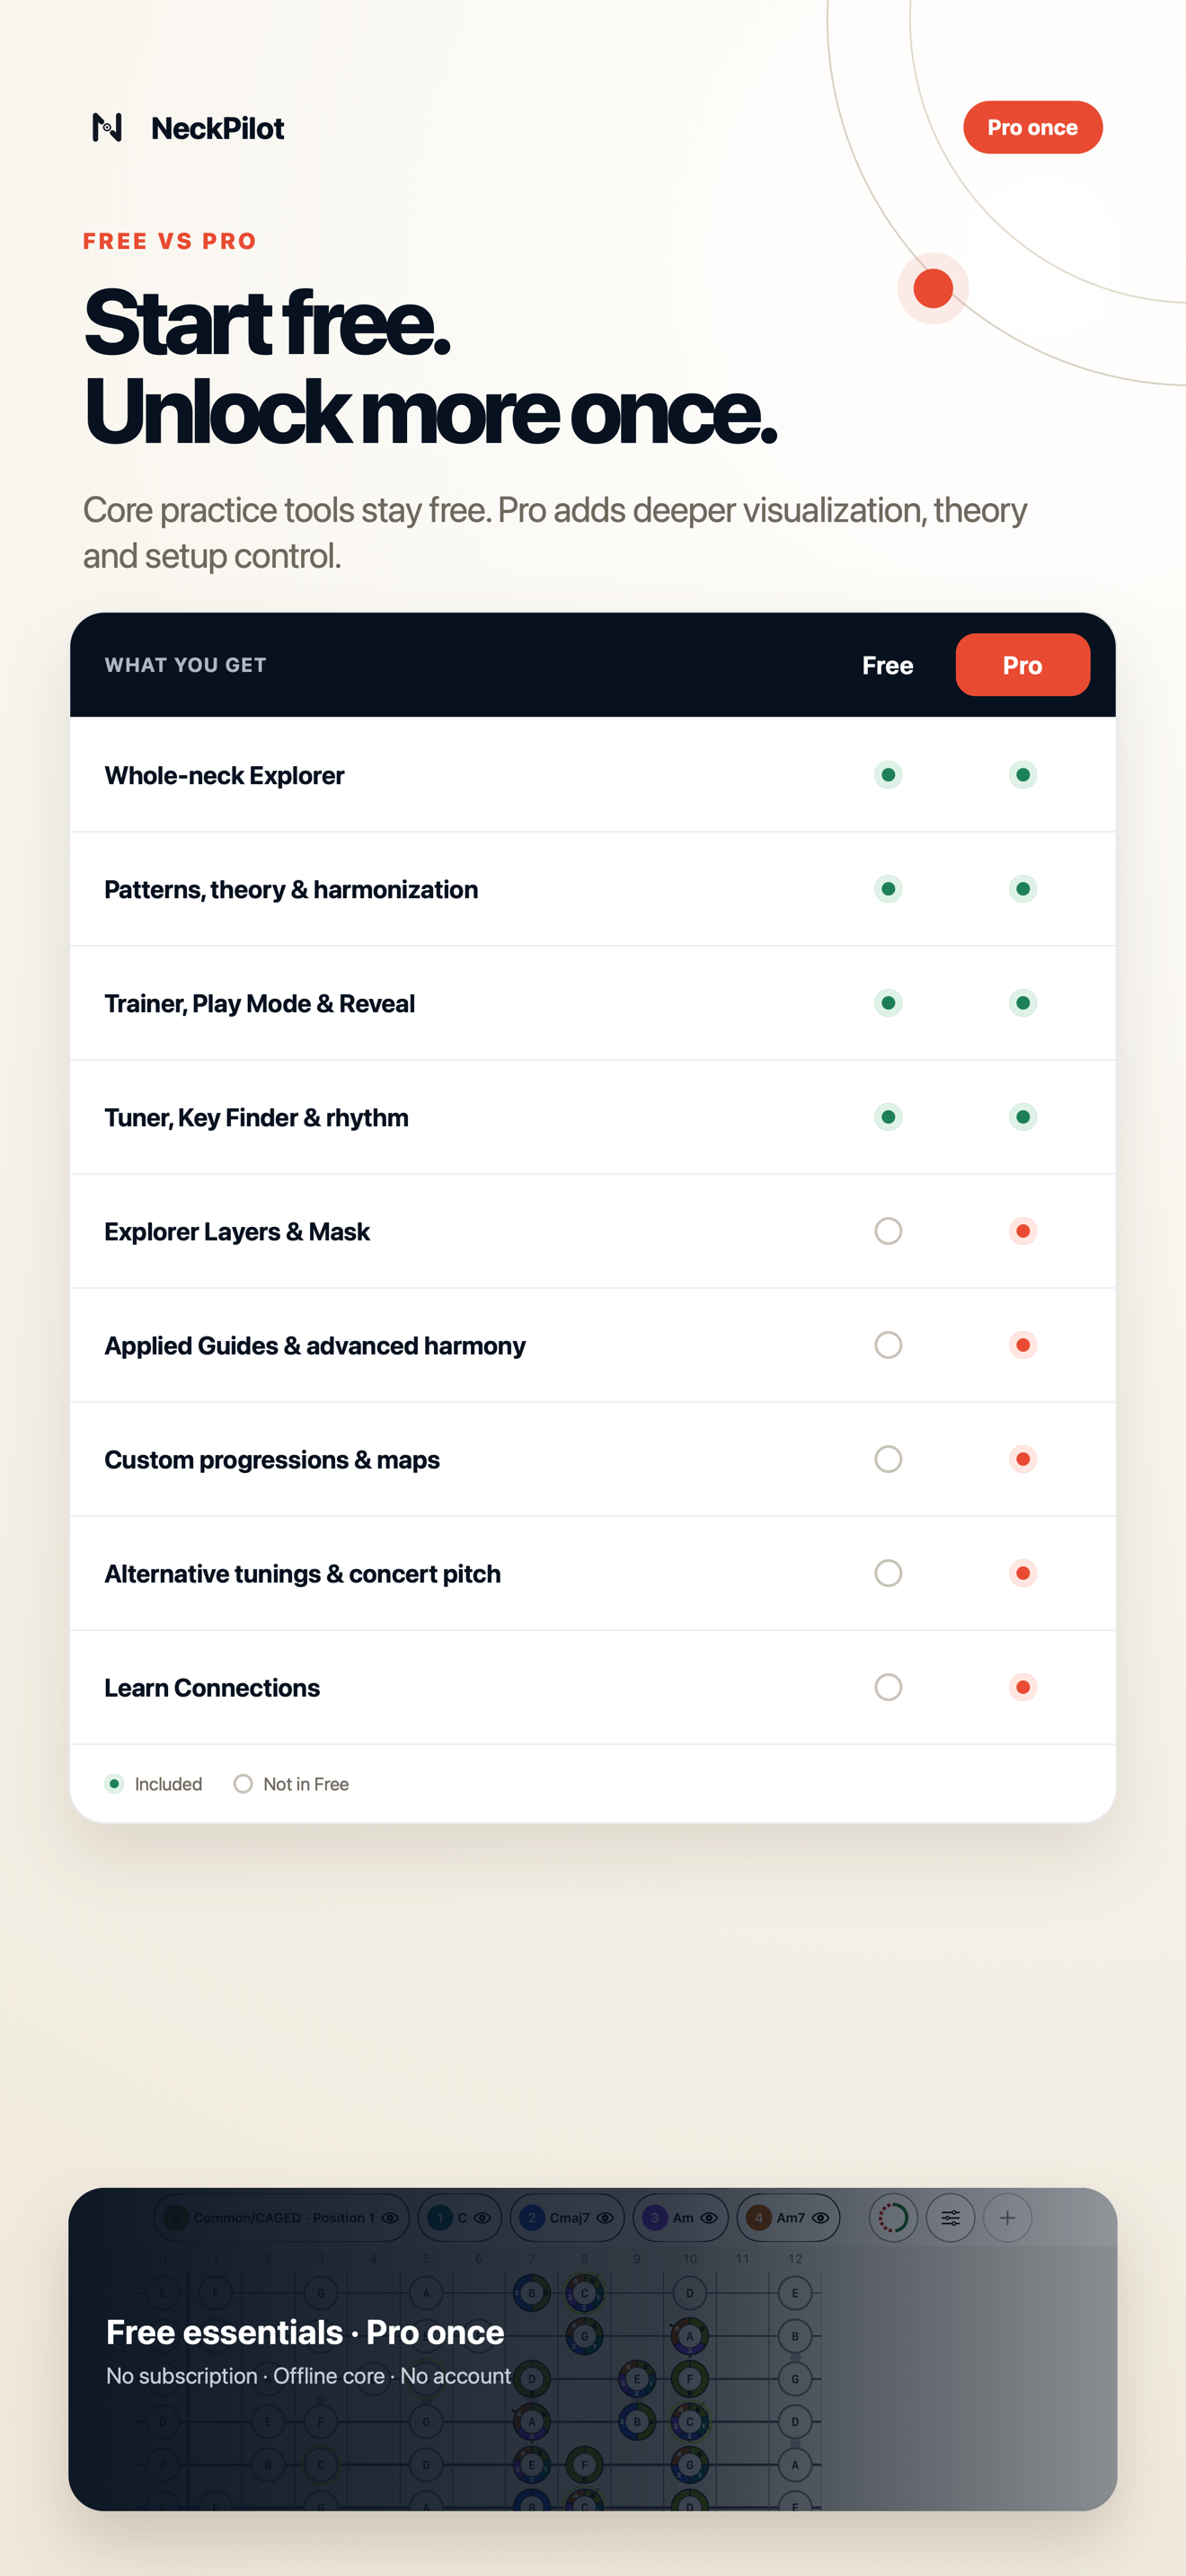
Screenshot: NeckPilot Free and Pro capability comparison.

Watch me use the app

Three more walkthroughs in my own voice.

These are my screen recordings. I talk through what I am doing while I use NeckPilot, and nothing plays until you press the button.

Explore Learn and its lessons

I move through positions, relative roots, chords, triads, and progression targets. Guide 06 has the written steps.

Open Theory and see where it leads

I find musical material and open its explanations and tools. Use Guide 03 for search and harmonization, or Guide 08 for Scale, Chord, and Arpeggio Guides.

Change tuning and base frequency

I change the active tuning, adjust the concert-pitch reference, and check the result in Tuner. The details are in Guide 11.

Recovery and common questions

When something does not behave as expected.

The microphone tool hears nothing

Open iOS Settings → Privacy & Security → Microphone and enable NeckPilot. Then return, stop any other audio session, reduce room noise, and play one clean sustained note.

Playback stopped when I opened Tuner or Key Finder

That is intentional. Microphone capture and practice output do not run together. Restart the Metronome or Drum Machine after leaving the microphone feature.

A pattern, shape, fingering, or notation view is unavailable

Return to Full neck or choose a validated built-in position for the active setup. Full-neck semantic content is broader than setup-specific playable resources.

A shared Favorite asks for Pro

The link preserves the musical workspace but never grants an entitlement. Open the Free-compatible parts, or unlock/restore Pro through the App Store to use its Pro content.

Key Finder shows several plausible answers

Play a longer stable progression and compare its chords/melody with each candidate in Explorer. Relative major/minor ambiguity and borrowed harmony are real musical uncertainty, not simply a detection error.

How do I restore Pro on another device?

Open Settings → NeckPilot Pro → Restore Purchases while signed into the Apple Account that owns the purchase. NeckPilot checks the verified StoreKit entitlement and does not maintain a separate account.

My Key Finder walkthrough

Watch me test a possible key.

I play into Key Finder, compare its candidates, and open one in Explorer. Guide 09 explains the same route step by step.

The result is an estimate. Some music has more than one reasonable answer.

Try one guide with your instrument.

Explorer is a good place to begin, and the Free tools do not expire. Pro is there if you later want the extra harmony, progression, Learn, or setup features.